
upload photo | donate | calendar
 |
my profile |
register |
faq |
search upload photo | donate | calendar |
|
|
|
|
#1 | |
|
User
Join Date: Sep 2007
Posts: 1,225
Thanks: 2,679
Thanked 930 Times in 509 Posts
|
Quote:
I thought you already knew that. |
|
|
|

|
|
|
#2 |
|
Lifer
Lifetime Forum Patron Join Date: Feb 2009
Location: ...on the 'ol Erie Canal...
Posts: 8,183
Thanks: 1,400
Thanked 4,442 Times in 2,330 Posts
|
I don't have an Erma unit to look at, and the brief description doesn't say which spring was replaced, or if the P-38 spring was clipped...Or why it was substituted...
The salient part of Patrick Villier's comment to me was "The Erma conversion is not all that successful". For the $500-$600 these kits are going for these days, I'm happy to remain ignorant. Edit: Patrick Villiers expands further on his comments on Jan Still's forum - http://luger.gunboards.com/showthrea...n-kits-for-P08 (Patrick is Guest_V). There are two springs in the Erma toggle; one for recoil, one for the firing pin. The Erma toggle assembly comes apart quite easily for replacing the springs; chasing them across the room can be invigorating... Maybe Ed Tinker would be willing to try replacing his Erma 'recoil spring' with a P-38 mainspring...The Erma spring is called a 'breech-closing spring' in the Erma manual/parts breakdown... 
__________________
I like my coffee the way I like my women... ...Cold and bitter... 
Last edited by sheepherder; 11-04-2014 at 05:08 PM. |
|
|

|
|
|
#3 |
|
Lifer
Lifetime Forum Patron Join Date: Jun 2002
Location: The Capital of the Free World
Posts: 10,154
Thanks: 3,003
Thanked 2,306 Times in 1,097 Posts
|
Here is an update to this peculiar attempt to convert a standard Luger upper assembly to .22 Long Rifle.
As I continue to study the modifications made by the original engineering gunsmith for this .22 coversion attempt I am awed by his ingenuity... and left scratching my head by other things... This image shows extensive modifications to the toggle to include a complete change to the design of the sear/striker/disconnector/toggle linkage: Point D arrow is pointing at the new Sear/Striker. The sear engagement point is at Point A. The sear has been made an integral part of the breechblock. The firing pin release surface is completely different to match the new sear and the firing pin retainer is held in place by the pin at point B. The new sear bar is pinned in place at point C and works much like the original sear does on the upper receiver. The new disconnector shown at point H is identical in operation to the original sear/disconnector engineering except the whole operation has been moved to the breechblock. Notice that the forward toggle cam is behind the new sear bar at Point G. Point E and Point F show changes in the geometry of the toggle pin points to allow blowback of the breechblock without movement of the upper receiver. This is the reason for the new sear/disconnector. Without movement of the upper receiver the old sear/disconnector would never disconnect. The original sear bar has been modified by replacing the spring loaded disconnector pin with a solid non moving pin that has a protrusion that passes the movement on to the new sear bar. I will make more and better photos of this engineering and update this thread as I find time to disassemble the toggle further. I still haven't quite figured out the purpose of the spring loaded pin behind the open toggle joint, as it does not engage anything. Perhaps it is a helper to opening the toggle on firing. More to come as it happens. I hope all you armament engineering enthusiasts are enjoying this reverse engineering investigation thread.  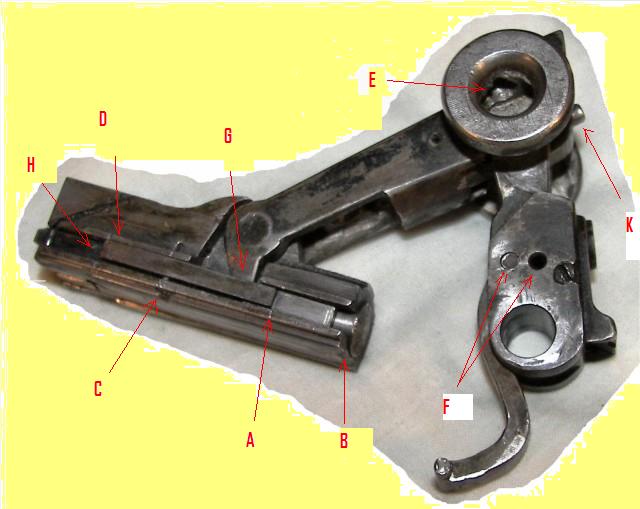
__________________
regards, -John S "...We hold these truths to be self-evident that ALL men are created EQUAL and are endowed by their Creator with certain UNALIENABLE rights, and among these are life, LIBERTY, and the pursuit of happiness..." |
|
|

|
|
|
#4 |
|
Lifer
Lifetime Forum Patron Join Date: Jun 2002
Location: The Capital of the Free World
Posts: 10,154
Thanks: 3,003
Thanked 2,306 Times in 1,097 Posts
|
Here are some new photos of additional parts showing just how extensive this modification prototype really is...
Bottom of the Upper Receivers...(conversion is on the top, bottom is 1937 S/42) 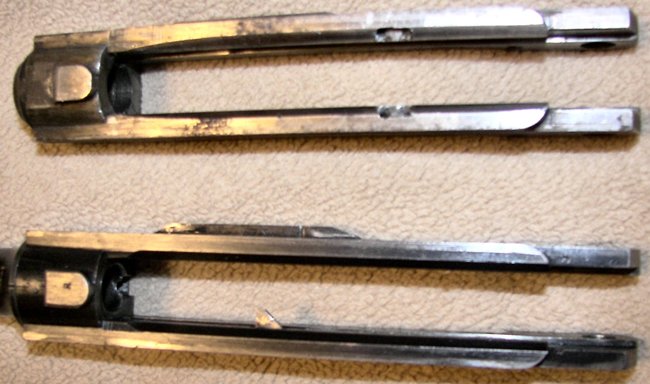 Bottom of the Chamber areas (conversion on the right) 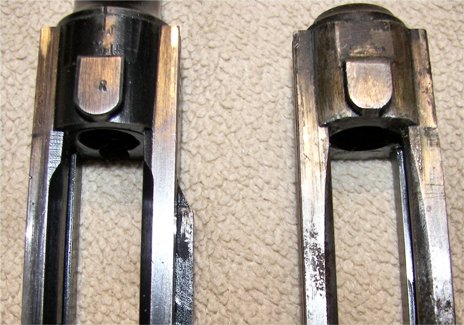 Left Side Rear of the Upper Receiver (conversion on top) notice the roughness of the modifications on the sear / sear spring slot. 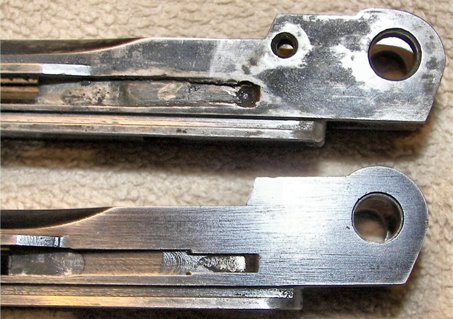 Right Side Rear of Upper Receiver (conversion on top) Notice the lack of the ejector opening. 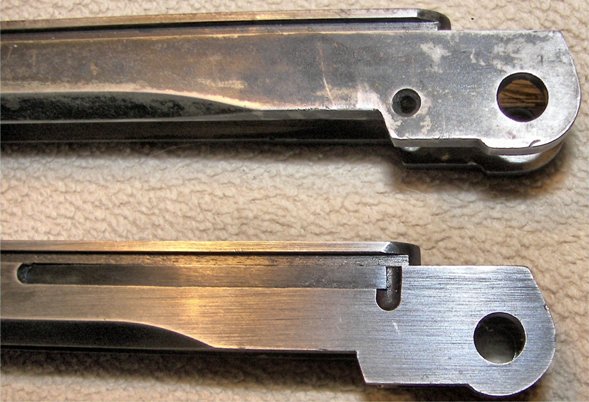 All sides comparison of the sear bars (the conversion bar is on the bottom... dramatic and drastic changes here) 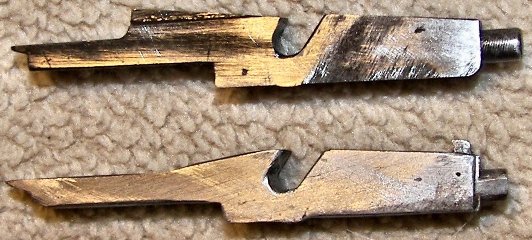 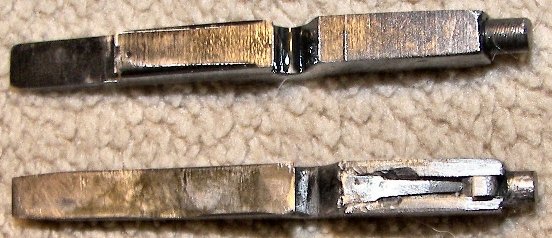 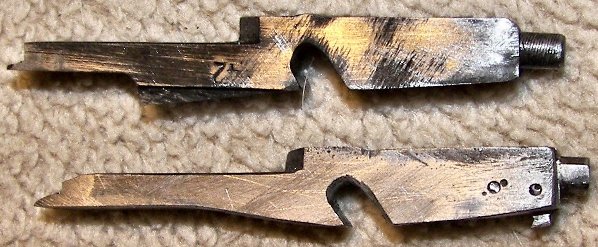 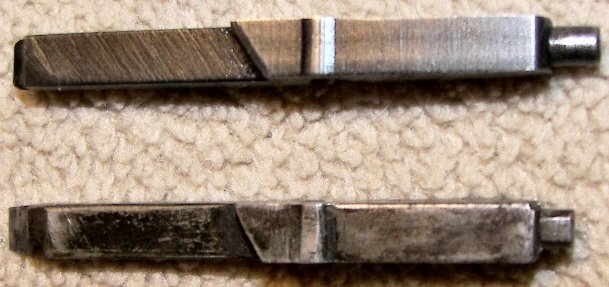 More images next post 
__________________
regards, -John S "...We hold these truths to be self-evident that ALL men are created EQUAL and are endowed by their Creator with certain UNALIENABLE rights, and among these are life, LIBERTY, and the pursuit of happiness..." |
|
|

|
|
|
#5 |
|
Lifer
Lifetime Forum Patron Join Date: Jun 2002
Location: The Capital of the Free World
Posts: 10,154
Thanks: 3,003
Thanked 2,306 Times in 1,097 Posts
|
More detailing of the changes made by this prototype...
The top view of the receiver ring (conversion on the right - like it is no obvious huh?  ) Also notice the difference in the thickness of the barrel flange on the 9mm barrel and the barrel stub in the conversion receiver. ) Also notice the difference in the thickness of the barrel flange on the 9mm barrel and the barrel stub in the conversion receiver.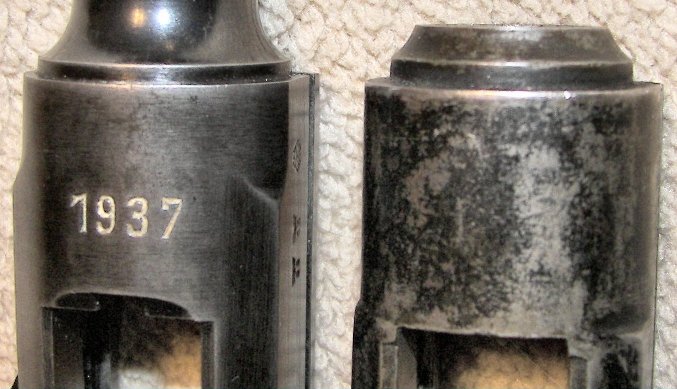 Changes to to rear and forward toggle linkage. Note the movement of the toggle coupling link and the difference in physical size of the coupling links. The conversion coupling link is much thicker. I am not sure if this link is original or fabricated... but original would be my guess. 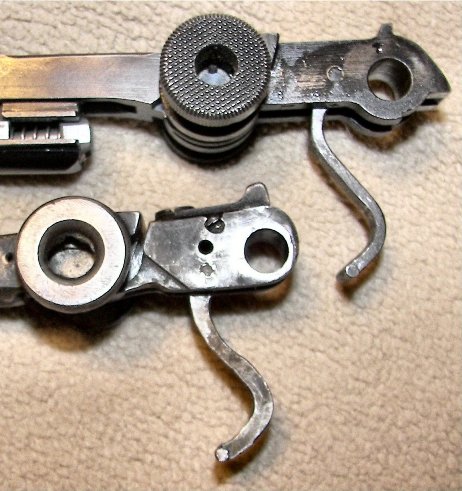 Breechblock left closeup. While difficult to see in this photo, the underside of the conversion toggle includes a spring loaded buffer of sorts, that I think contributes to the ability to operate this system as a blowback when combined with the difference in the toggle hinge pin locations, rather than locked breech toggle like the original design.  The right side of the breechblocks. Notice that the original block is round on the bottom and the conversion is flat... probably for proper feeding and clearance working with a .22 magazine. 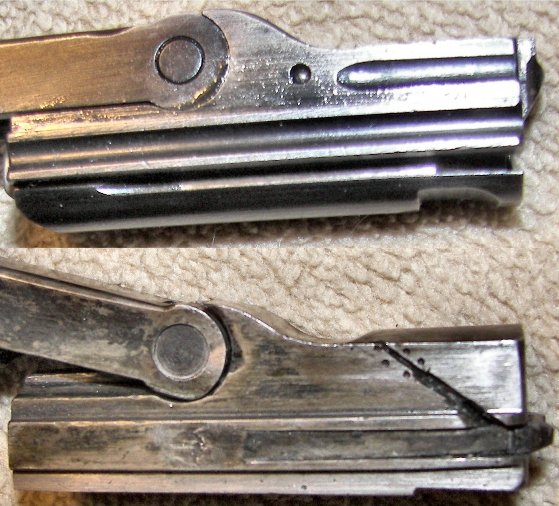 Notice how the rear end of the rear toggle has been substantially ground down to allow opening of the toggle without moving the upper receiver. This accounts for a major reduction of resistance during the blowback operation. 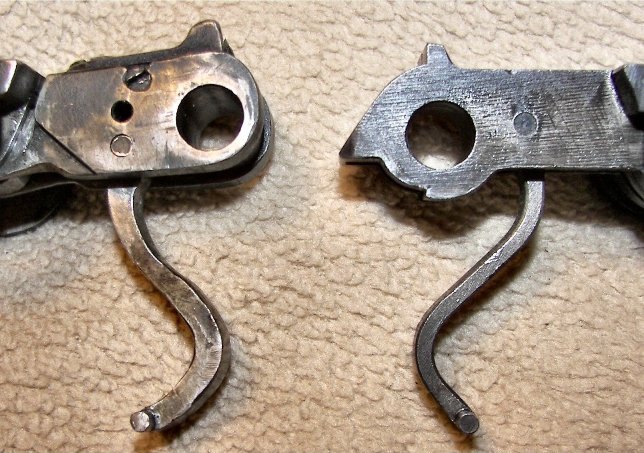 My next installment should include better photos of the underside of the toggles to show the elaborate spring loaded buffer that was created on the conversion. I hope this photos essay has been capturing your interest and has been as thought provoking for some of you as it has been for me to do this study.
__________________
regards, -John S "...We hold these truths to be self-evident that ALL men are created EQUAL and are endowed by their Creator with certain UNALIENABLE rights, and among these are life, LIBERTY, and the pursuit of happiness..." |
|
|

|
|
|
#6 |
|
Lifer 2X
Lifetime Forum Patron Join Date: May 2005
Location: Somewhere in Montana
Posts: 2,636
Thanks: 3,174
Thanked 2,559 Times in 955 Posts
|
John
Has been interesting to me, keep them coming. Bill
__________________
Bill Lyon |
|
|

|
|
|
#7 |
|
Lifer
Lifetime Forum Patron Join Date: Jun 2002
Location: The Capital of the Free World
Posts: 10,154
Thanks: 3,003
Thanked 2,306 Times in 1,097 Posts
|
Thanks for the feedback Bill...
I just learned something new... the conversion breechblock does NOT fit in a standard upper receiver! It goes about 2/3's the way into the fork and screeches to a halt about 1 inch from the chamber... This may be just different tolerance in parts or the conversion upper may have been opened up to accept the conversion breechblock... I will spend some time on this measuring everything with my digital caliper, ... if I can find it!  It has been a long time since I did any mechanical engineering and I am sure I put it in a very safe place... I just don't remember where... senior moment I guess. It has been a long time since I did any mechanical engineering and I am sure I put it in a very safe place... I just don't remember where... senior moment I guess.
__________________
regards, -John S "...We hold these truths to be self-evident that ALL men are created EQUAL and are endowed by their Creator with certain UNALIENABLE rights, and among these are life, LIBERTY, and the pursuit of happiness..." |
|
|

|
|
|
#8 |
|
Lifer 2X
Lifetime Forum Patron Join Date: May 2005
Location: Somewhere in Montana
Posts: 2,636
Thanks: 3,174
Thanked 2,559 Times in 955 Posts
|
John
If you find your caliper let me know where it was, I may have a simular place where I stored something. At my age looking for something provides many hours of entertainment. I am sure you will figure out how to make your conversion work. Keep in touch. Bill
__________________
Bill Lyon |
|
|

|
|
|
#9 |
|
Lifer 2X
Lifetime Forum Patron Join Date: May 2005
Location: Somewhere in Montana
Posts: 2,636
Thanks: 3,174
Thanked 2,559 Times in 955 Posts
|
John
How is the 22 conversion coming? Was just looking at your pictures and wondering what was happening. Keep in touch. Bill
__________________
Bill Lyon |
|
|

|
|
|
#10 |
|
User
Join Date: Jun 2002
Location: Greenville SC
Posts: 1,004
Thanks: 377
Thanked 410 Times in 180 Posts
|
John, you might think about converting one of those redundant extractor slots to the ejector position.
|
|
|

|
|
|
#11 |
|
Lifer
Lifetime Forum Patron Join Date: Jun 2002
Location: The Capital of the Free World
Posts: 10,154
Thanks: 3,003
Thanked 2,306 Times in 1,097 Posts
|
Hi Bill & Heinz
Just a short update... I have splurged and purchased an antique Atlas/Craftsman lathe... that is about 400 miles away... I will have to find a way to go pick it up... and then I will have to spend some time tweaking it so it will do accurate work after the move to VA... I am going to do this project myself instead of farming out the work.. It will take longer this way, but I think the satisfaction level will be much higher... I sold my gunsmithing power tools 15 years ago... and have regretted it ever since. Over the next couple of years I intend to own not only a lathe, but a milling machine... all powered by Computer Numerical Control (CNC)... I won't be building guns from scratch, but I hope to be pursuing some very interesting modifications... Stay tuned... this project is far from over.
__________________
regards, -John S "...We hold these truths to be self-evident that ALL men are created EQUAL and are endowed by their Creator with certain UNALIENABLE rights, and among these are life, LIBERTY, and the pursuit of happiness..." |
|
|

|
|
|
#12 |
|
Lifer
Lifetime Forum Patron Join Date: Jun 2002
Location: The Capital of the Free World
Posts: 10,154
Thanks: 3,003
Thanked 2,306 Times in 1,097 Posts
|
Thanks for the support Rick... This lathe is exactly the same model as the one I sold 15 years ago... it is manual change gears... and a quick change box would be nice, but I am not a production shop... so I can live with it.
The bed is immaculate! and this lathe hasn't been used much... the previous owner is a retired machinist and he bought it new... now it was just taking up space in his garage... it comes with virutally all the original accessories including the manual... The only repair I need to to (that I know about) is the lead screw support bearing... the owner hadn't used it in years and while checking it out, he turned it on and engaged the table without remembering that he had locked it down and it caused the old lead screww support bearing to break cleanly... It was designed to to that to prevent lead screw damage in just those circumstances... don't ask me how I know (been there and done that)... the replacement bearings are running from 50-80 dollars on ebay for a used one... but I am pretty sure I can make the original one functional with good ole' JB Weld until I can fabricate a new one out of aluminum with bronze sleeve bearing... I will hold it to the bed with soft aluminum screws so I will have the same type of protection that the old Zamak metal casting used to provide... The screws will shear and neither the bearing nor lead screw should get damaged if something like this happens again to this old machinist gunsmith...  I will post photos when I get it home sometime in June... Can't wait to get it home, set it up, get it level, take care of any backlash, and start making 'chips'... 
__________________
regards, -John S "...We hold these truths to be self-evident that ALL men are created EQUAL and are endowed by their Creator with certain UNALIENABLE rights, and among these are life, LIBERTY, and the pursuit of happiness..." |
|
|

|
|
|
#13 |
|
Lifer
Lifetime Forum Patron Join Date: Jun 2002
Location: The Capital of the Free World
Posts: 10,154
Thanks: 3,003
Thanked 2,306 Times in 1,097 Posts
|
Sheepherder... old images restored through the kind generosity and assistance of John D.
__________________
regards, -John S "...We hold these truths to be self-evident that ALL men are created EQUAL and are endowed by their Creator with certain UNALIENABLE rights, and among these are life, LIBERTY, and the pursuit of happiness..." |
|
|

|
| The following member says Thank You to John Sabato for your post: |
|
|
#14 | |
|
Lifer
Lifetime Forum Patron Join Date: Feb 2009
Location: ...on the 'ol Erie Canal...
Posts: 8,183
Thanks: 1,400
Thanked 4,442 Times in 2,330 Posts
|
Quote:
 Now I will have to read it and try to understand it...  By the way...How'd it turn out??? 
__________________
I like my coffee the way I like my women... ...Cold and bitter... 
|
|
|
|

|
|
|
#15 |
|
Lifer
Lifetime Forum Patron Join Date: Jun 2002
Location: The Capital of the Free World
Posts: 10,154
Thanks: 3,003
Thanked 2,306 Times in 1,097 Posts
|
Rich, check your PM's ...
__________________
regards, -John S "...We hold these truths to be self-evident that ALL men are created EQUAL and are endowed by their Creator with certain UNALIENABLE rights, and among these are life, LIBERTY, and the pursuit of happiness..." |
|
|

|
|
|
#16 |
|
Twice a Lifer
Lifetime Forum Patron Join Date: Mar 2011
Location: Atop the highest hill in Schuyler County NY
Posts: 3,347
Thanks: 7,285
Thanked 2,579 Times in 1,366 Posts
|
Check with me if you need NOS Erma springs of any kind...
__________________
"... Liberty is the seed and soil, the air and light, the dew and rain of progress, love and joy."-- Robert Greene Ingersoll 1894 |
|
|

|
|
|
#17 |
|
Lifer
Lifetime Forum Patron Join Date: Feb 2009
Location: ...on the 'ol Erie Canal...
Posts: 8,183
Thanks: 1,400
Thanked 4,442 Times in 2,330 Posts
|
I pulled out my P-38/P-1 parts box and took some measurements -
Mainspring - .038" wire dia - .225" OD - 1.516" free length - 17 1/4 coils Recoil springs [two slide springs] - .026" wire dia - .207" OD - 5 1/8" free length - many coils  I don't have an Erma toggle to measure the springs, but I have to say that I'm skeptical of using the P-38 mainspring... 
__________________
I like my coffee the way I like my women... ...Cold and bitter... 
|
|
|

|
|
|
#18 |
|
Twice a Lifer
Lifetime Forum Patron Join Date: Mar 2011
Location: Atop the highest hill in Schuyler County NY
Posts: 3,347
Thanks: 7,285
Thanked 2,579 Times in 1,366 Posts
|
Rich,
The P.38 mainspring looks like the mainsprings in the Erma KGP series pistols. The P.38 recoil springs look like f.p. springs of that same series, as well as the earlier, cast zinc models. The latter models have actin springs that are similar, but a bit heavier gauge. The springs in the conversion kits are most similar to the latter models' respective springs. I have lots of all these springs, in case you need some.
__________________
"... Liberty is the seed and soil, the air and light, the dew and rain of progress, love and joy."-- Robert Greene Ingersoll 1894 |
|
|

|
|
|
#19 |
|
Lifer
Lifetime Forum Patron Join Date: Feb 2009
Location: ...on the 'ol Erie Canal...
Posts: 8,183
Thanks: 1,400
Thanked 4,442 Times in 2,330 Posts
|
Dave, I don't need any at this time; I'm just trying to figure out what Patrick Villiers meant about replacing the Erma SE 08/2 kit springs with a 'P38 mainspring'. I don't see how that would work. A chopped-down P-38 recoil spring looks more likely. My experience (in '.22 Long barrel' thread further down in the forum) was that the springs were too strong. Both the Erma firing pin spring and the recoil spring absorb .22 recoil until the firing pin cocks, then it's just the recoil spring. It wasn't recoiling far enough to eject or chamber a round.
The entire cannon assembly has to recoil the ~1/4" in order to line up the magazine with the barrel/chamber. Otherwise the cartridge won't be picked up by the breechblock. The breechblock has to recoil all the way or the spent case won't hit the Erma ejector. The Erma toggle assembly I tested wasn't going back any further than ~3/4" and with one frame it was binding. I couldn't do any physical changes because it wasn't my Erma kit and I wasn't about to machine my Luger. Weaker springs sound like the next step in getting that particular kit to work, but Patrick's comments are pretty discouraging vis-a-vis Erma .22 kits collectively. 
__________________
I like my coffee the way I like my women... ...Cold and bitter... 
|
|
|

|
|
|
#20 | |
|
Lifer
Lifetime Forum Patron Join Date: Feb 2009
Location: ...on the 'ol Erie Canal...
Posts: 8,183
Thanks: 1,400
Thanked 4,442 Times in 2,330 Posts
|
Quote:
 And I'll make a note on my bulletin/work board not to accept any work on these POS's! 
__________________
I like my coffee the way I like my women... ...Cold and bitter... 
|
|
|
|

|
 |
| Thread Tools | |
| Display Modes | |
|
|