
upload photo | donate | calendar
 |
my profile |
register |
faq |
search upload photo | donate | calendar |
|
|
#1 |
|
User
Join Date: Oct 2007
Location: Maryland
Posts: 358
Thanks: 45
Thanked 125 Times in 59 Posts
|
In this thread, I'm going to document an early pattern French made MAS 1935S pistol. Very few of these are around anymore and examples sans a serial number are so scarce that even Jean Huon can only speculate as to their origin. In my personal research, I could find no detailed pictures of one and all of it's markings so, that's what we're going to do here. I'm also going to go over a few of the accessories that were made for these pistols.
Now, when talking about old firearms, we always hear "buy the gun, not the story", and I agree with that line of thinking. However, in this case, I'm going to tell you the story because I happen to believe it. But even without the story, this pistol speaks for itself. We cannot know whether it was built before 1940 or after the factory was liberated in 1944, but it was certainly built before the end of the war. This pistol came from a 77 year old Veteran who was a family friend of the man who brought this back after the war. That man's name was Charles Slagle Jr., born in 1925, and passed on in 2011. According to his obituary, he was a member of the 101st Airborne. I was told that the entire rig was being passed on to me exactly as it was brought home. Judging by the imprint that the pistol has left in the holster, I 100% believe what I was told. Additionally, the pistol was absolutely bone dry with not a trace of lubrication to be found other than that which had dried on it decades before. It was difficult to disassemble due to the fact that some of the parts had frozen from dried lubricant. The phosphate was an almost bright green that, once oiled, darkened considerably to the shade that we are accustomed to seeing on MAS made examples. It came in a holster that I cannot identify:  The correct holster would have been a Model 1937. We'll take a look at that and the pictured cleaning kit later:  As you can see by looking at the rear, it's been modified from its original form: 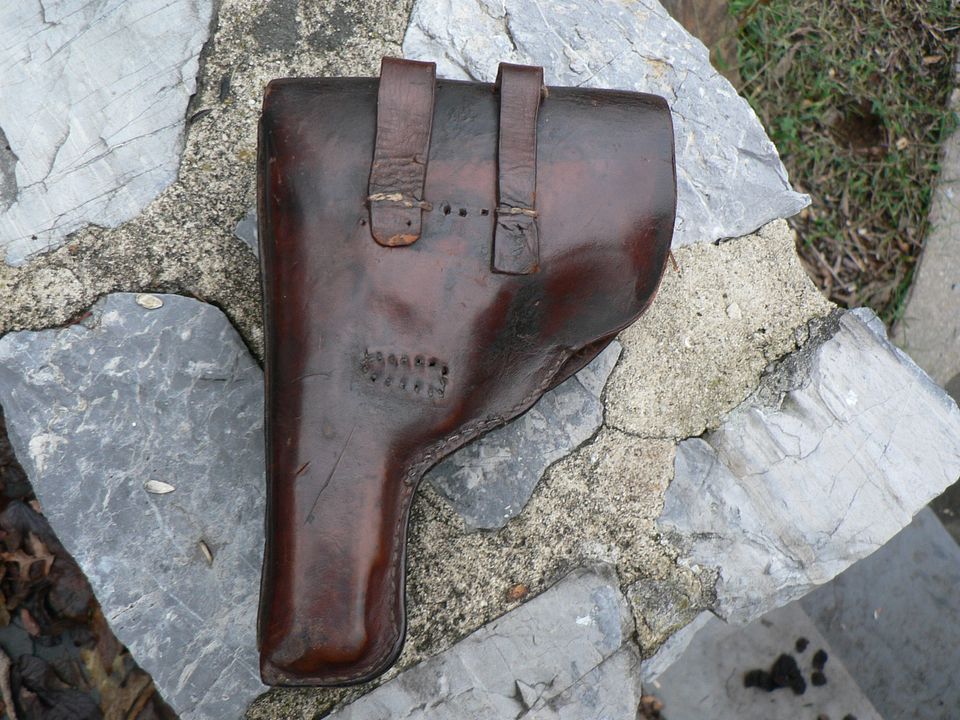 Notice that time has molded the holster to the pistol. You can even see the protruding barrel. The closure stud is a mystery to me. It is marked on both the front and rear:   The spare magazine pouch was restitched too to perfectly fit a 1935 magazine: 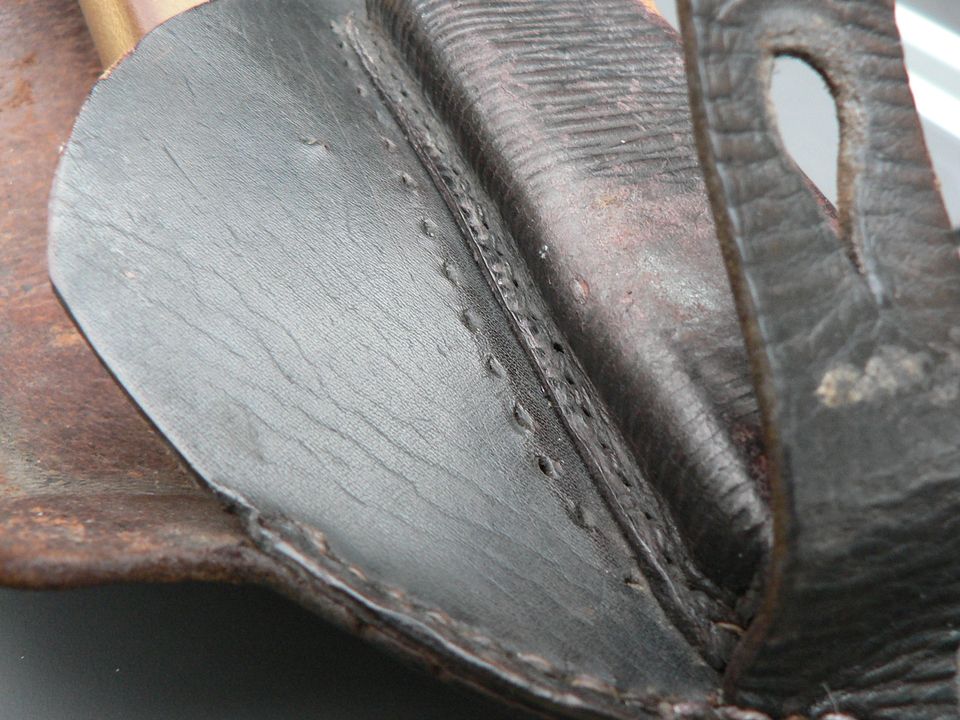 When the pistol is in the holster and the flap is secured, there is a fair amount of space between the rear of the pistol and the flap, leading me to believe that it was originally intended to hold a slightly larger sidearm. Mr. Slagle added some flair to his prize:  Other than the missing serial number and the early style safety, there is nothing remarkable about this particular 1935. Almost all of the parts will interchange with a common M1 example. Still, because this variation is so scarce, I think it would be useful to the hobby for me to document this one. We start with general left and right hand views:  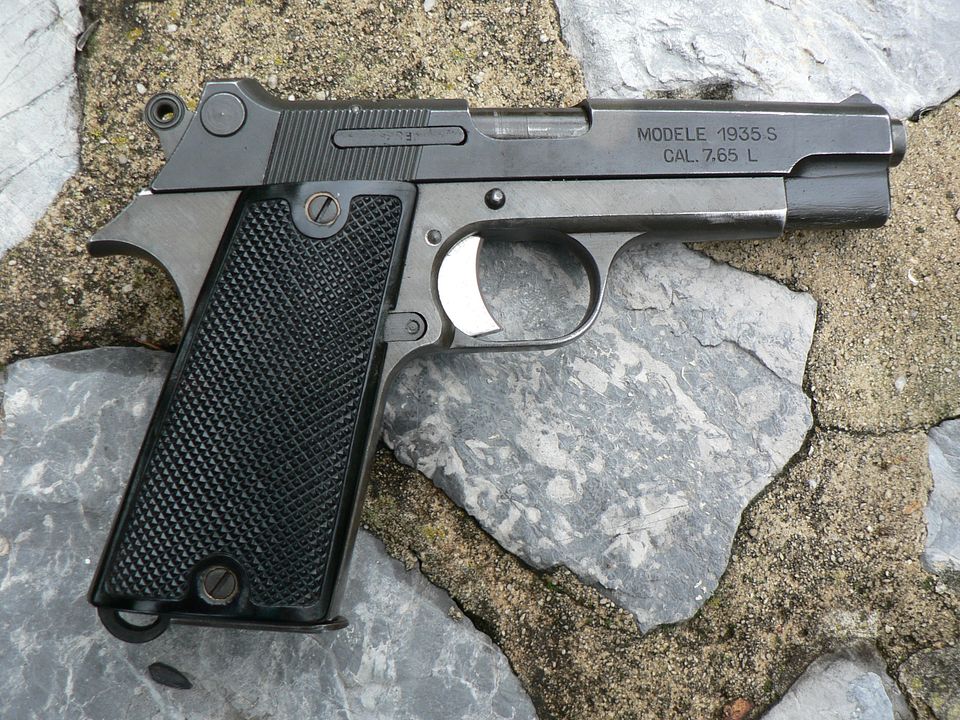 Other than the absent "M1" after the "S", the markings are standard. Normally, there is a serial number on the frame below the slide markings. Here, it is absent. It is almost a certainty that this mystery will never be solved. Manufacturer's mark on the left side of the slide:  Both magazines are the proper early style with milled floorplates: 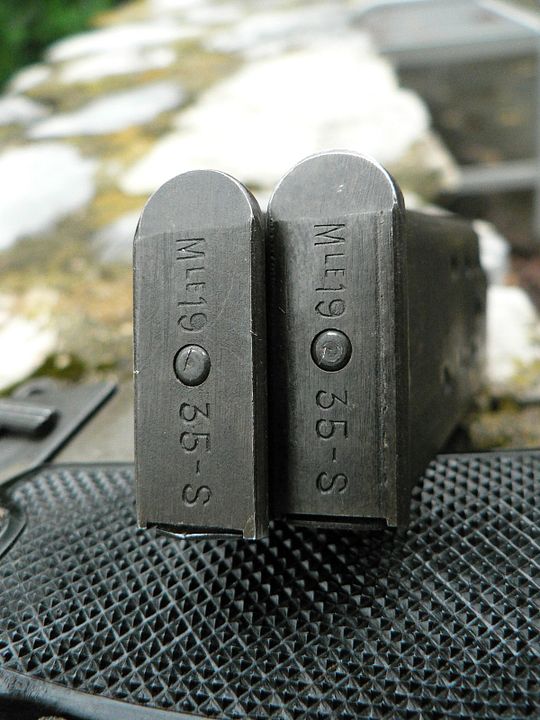 The follower and stop plate are different than the later style magazines too. We'll look at them later when we disassemble a magazine. Left and right hand views of the pistol disassembled:   That's it for this post. In the next one, we'll begin looking at the various bits and the markings I could find. I'll see you then. |
|
|

|
| The following 2 members says Thank You to Wilhelm for your post: |
|
|
#2 |
|
User
Join Date: Oct 2007
Location: Maryland
Posts: 358
Thanks: 45
Thanked 125 Times in 59 Posts
|
The first thing we'll look at are the grip panels:
 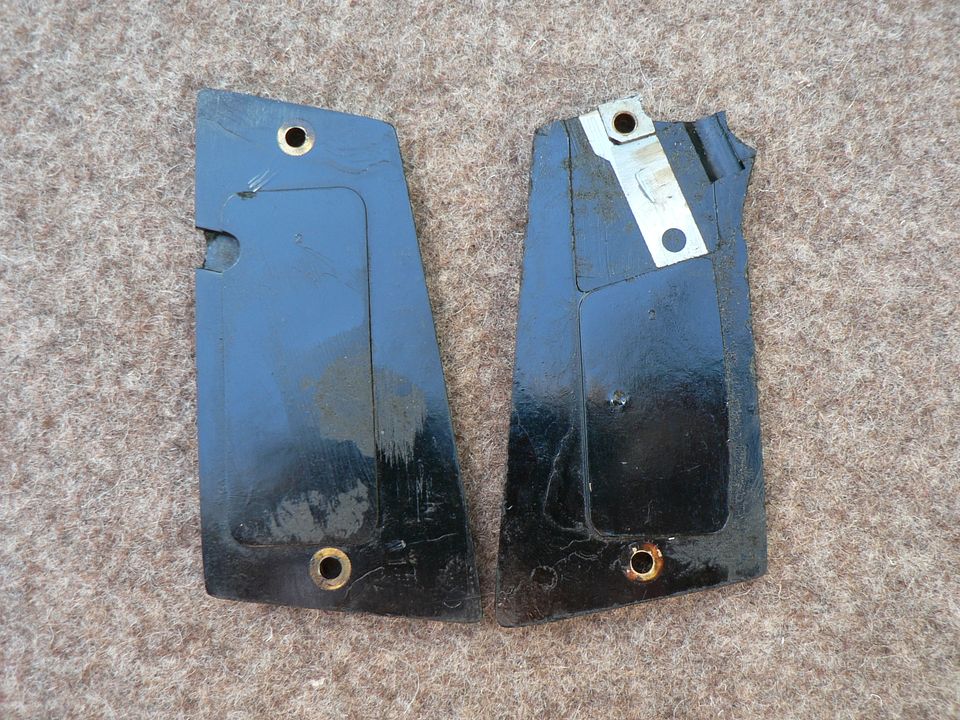 They are bakelite molded over a steel armature. The rosettes for the screws appear to be brass. Both have a number "2" molded into them:  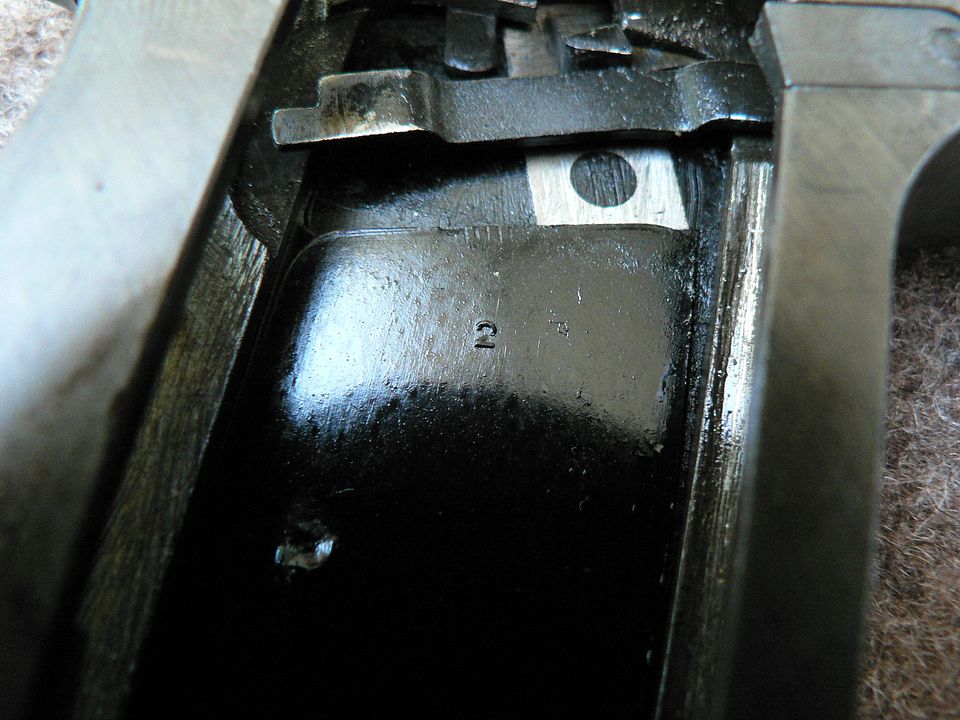 These are standard grips as found on any 1935S. To avoid repeating this again and again, I will restate what I said in the first post. Other than safety components, every other finished part on this pistol should interchange with any finished part manufactured by MAC or SAGEM. Now that I've typed this, I don't need to repeat myself again. The barrel is devoid of markings save for one spot that may be an illegible stamp. On the other hand, it may just be a pit in the steel or a machining mark. I simply don't know. You be the judge: 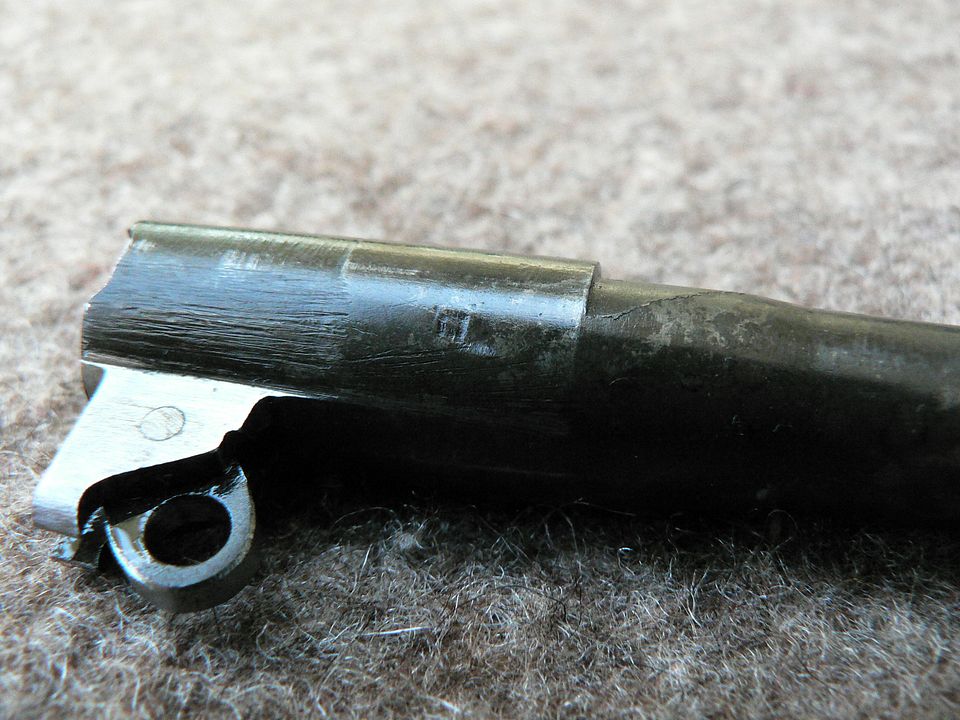 Notice the considerable amount of what appear to be marks created by hand working. Also, both sides of the clevis for the link have had all phosphate polished away. The phosphate finish on the barrel is very uneven and blotchy. It reminds me of very late war German stuff. I like it!  Locking shoulder: 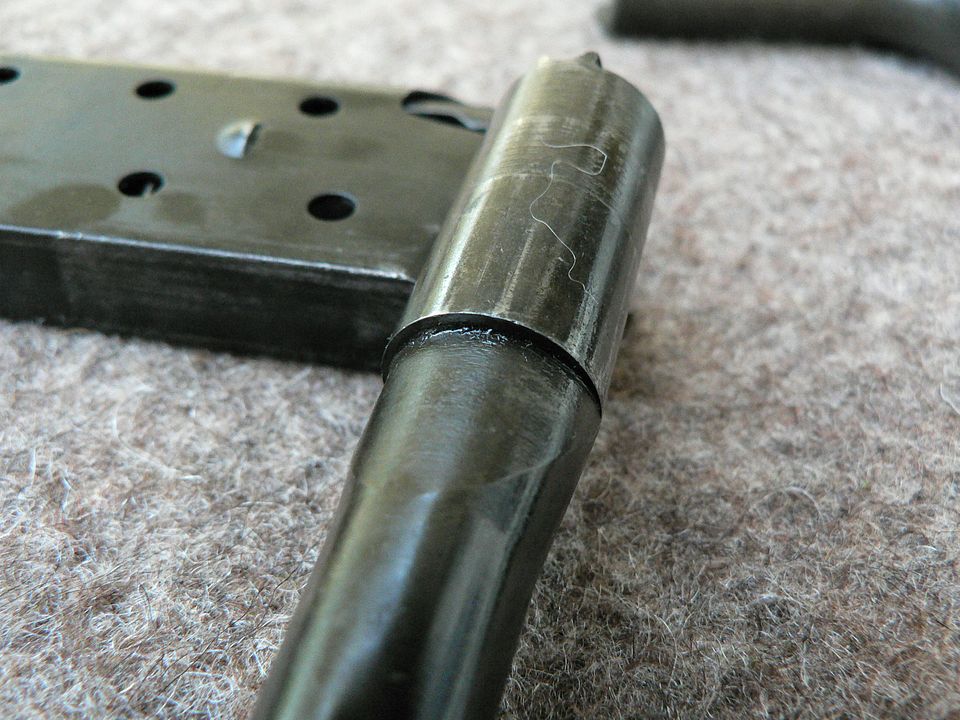 The whit squiggly line on top of the chamber is just a thread from the old Swiss blanket I'm using. The bore has four grooves. Other than some crud in there from my incompetent cleaning job, the barrel is shiny bright with no wear or frost:   Breech end showing a polished feed ramp: 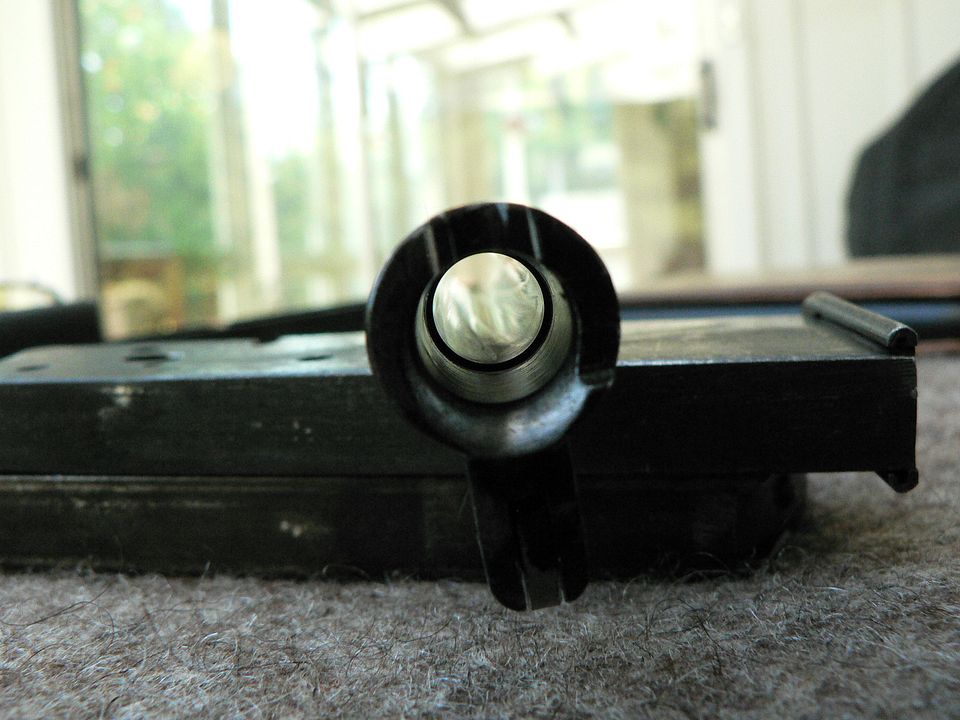 When we look at the frame, you'll see that its ramp is polished as well. |
|
|

|
|
|
#3 |
|
User
Join Date: Oct 2007
Location: Maryland
Posts: 358
Thanks: 45
Thanked 125 Times in 59 Posts
|
Next up is the slide stop. The one on this example appears to be unmarked. It is painted in the same black paint found on MAS rifles up until just after the war:
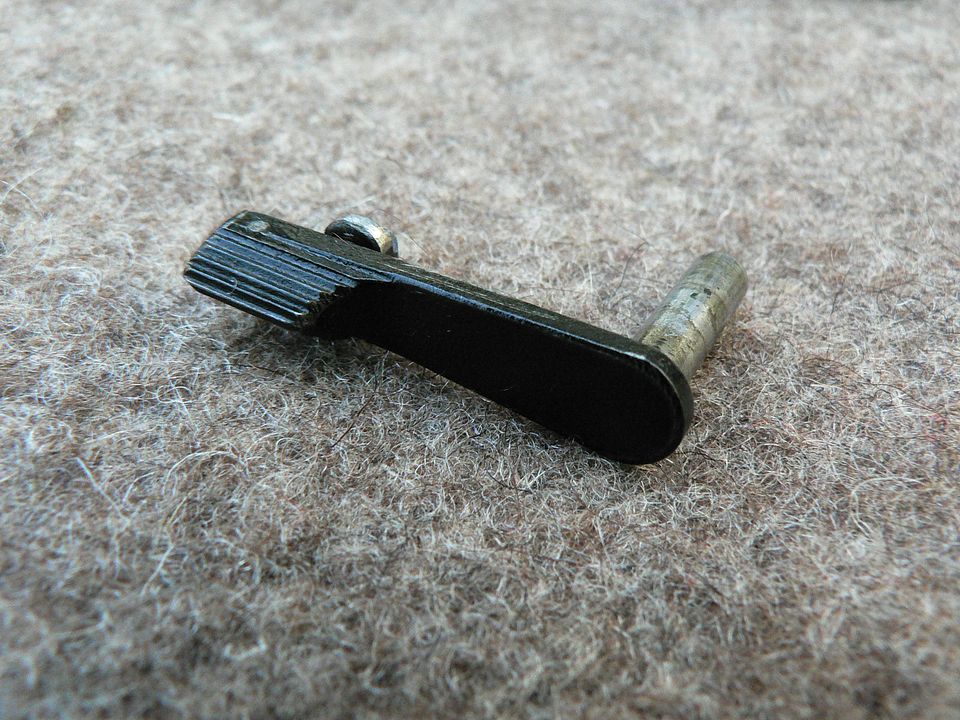 Note that the axle is polished for smooth function. Other than the red painted "Fire" indicator on the slide, the only other paint present is on the mechanism support, but only part of it. Although I'm only showing the left side of it, the entire mechanism support is phosphated:  However, the back of it is painted black. I've shown it below in the frame so as to illustrate the contrast between the paint and the phosphate:  Here is the rear of the mechanism support after removal from the frame:  The only mark on it is an "L" on the upper left side, shown below from two angles:   The bottom face of the hammer is marked with an "R":  
|
|
|

|
| The following member says Thank You to Wilhelm for your post: |
|
|
#4 |
|
User
Join Date: Oct 2007
Location: Maryland
Posts: 358
Thanks: 45
Thanked 125 Times in 59 Posts
|
Tonight, we'll take a look at the slide. Just as often found on this pistols replacement, the Mle 1950, the slide on this example is considerably darker than the frame. In fact, it's so dark that it might be mistaken for paint but it's not, it's just phosphate. When I first received this pistol, it was, as noted earlier, bone dry. In that state, the slide was much lighter and had a distinctly green hue. But the phosphate soaked up the Eezox and Breakfree CLP like a sponge and darkened up a lot. I considered leaving it exactly as found but I don't consider it a good idea to leave the finish unprotected like that. Obviously, this didn't actually change the finish and would eventually return to its previous state if left unattended for eighty years.
Besides the lack of a serial number, the features that make this particular variant of the 1935S so desireable among collectors is the "MAS" marking on the left side of the slide: 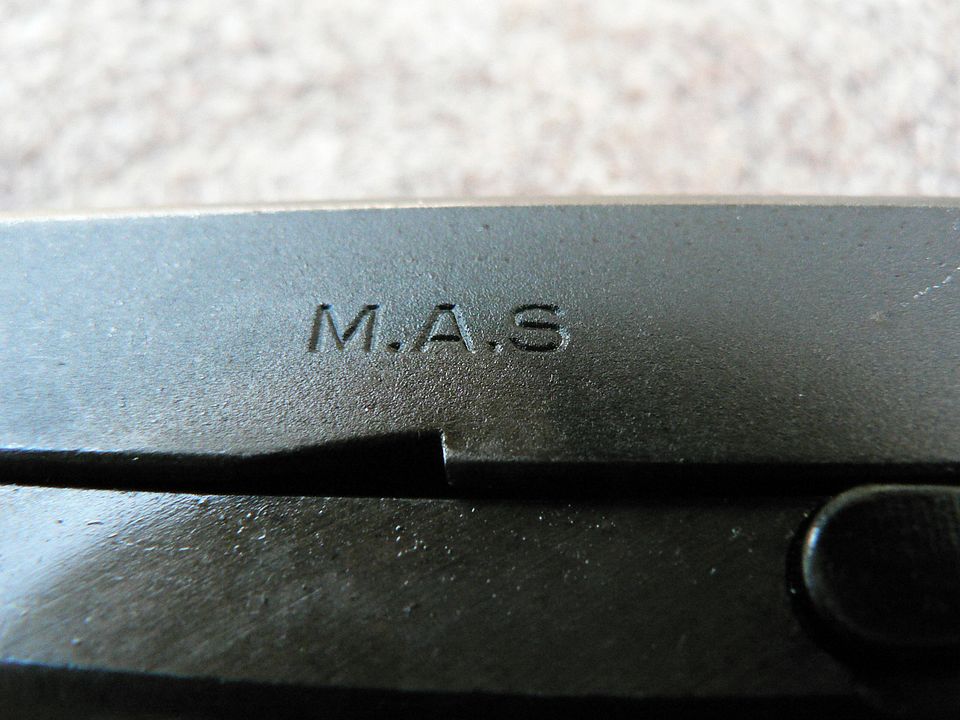 Note that here is a period after the "M" and the "A", but one is absent after the "S". MAC produced pistols are the same way. This is common and universal across both MAS and MAC production. While grammatically incorrect, the marking is more aesthetically pleasing this way and the French are big on such things. The triggers in the vast majority of these pistols are polished aluminum. It's the only use of aluminum in the entire pistol and I can't help but wonder if they are that way simply for looks. The French are, well....French! That's part of why I love their stuff so much! And the early style safety. Below shown in the "SAFE" position:  And the "FIRE" pisition:  According to accepted figures, MAS themselves manufactured 6,626 pistols and contracted Manufrance to build another 10,000. The Manufrance examples are also marked as "MAS" on the slide but the frames are marked "MF" to denote their manufacture. Very few of these early safety examples are known to still exist and examples without a serial number are vanishingly rare. In my research, I discovered four, although I would bet there are more still out there waiting to be discovered. One is in Medlin and Doane's book "The French 1935 Pistols", two online in private hands, and this one. Here is the picture and caption from Medlin and Doane's book:  Generally speaking, the finish is even across the slide but the phosphate took on a lighter hue in three places where the hardening of the steel was different. The first place is at the front of the ejection port:  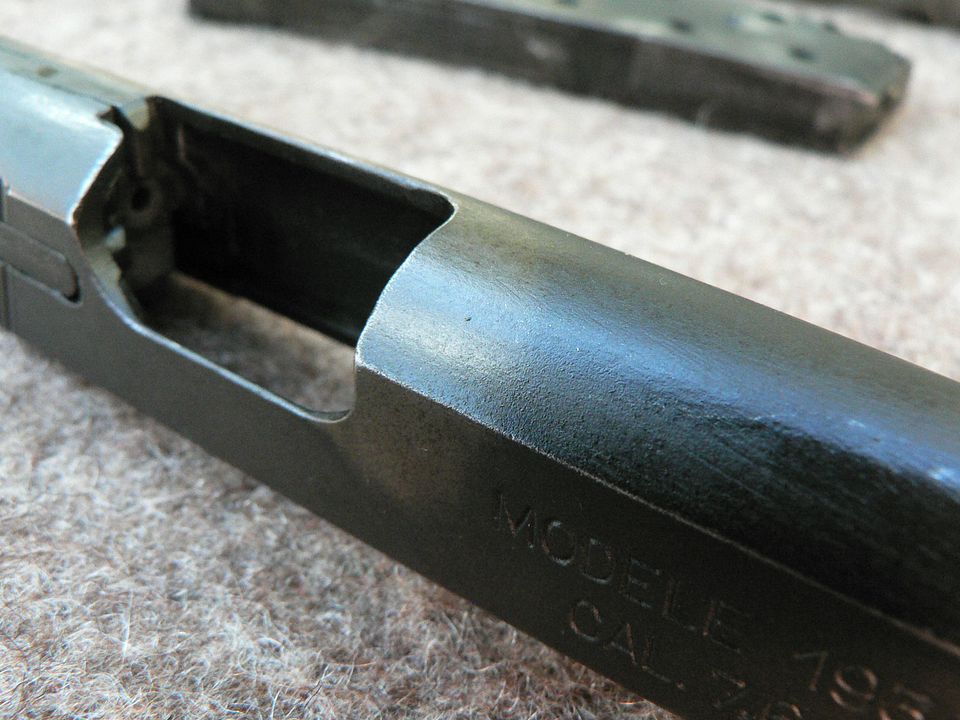 This is where the barrel and slide lock up. The second place is where the slide stop engages the slide:  And the third place is where the slide interacts with the disconnector:  There are only a couple other markings to be found on the slide. One is a "V" on the underside to the rear of the breech face:   The other marking is not on the slide itself, but rather on the extractor in the form of what looks to be an upside down "FS":  I cannot say if the safety drum us marked internally as I am unwilling to disassemble the safety. On the inside of the slide, we find obvious signs of hand fitting on the left side in front of the ejection port:  In the same spot on the right side, there is no finish loss:  Here is the firing pin: 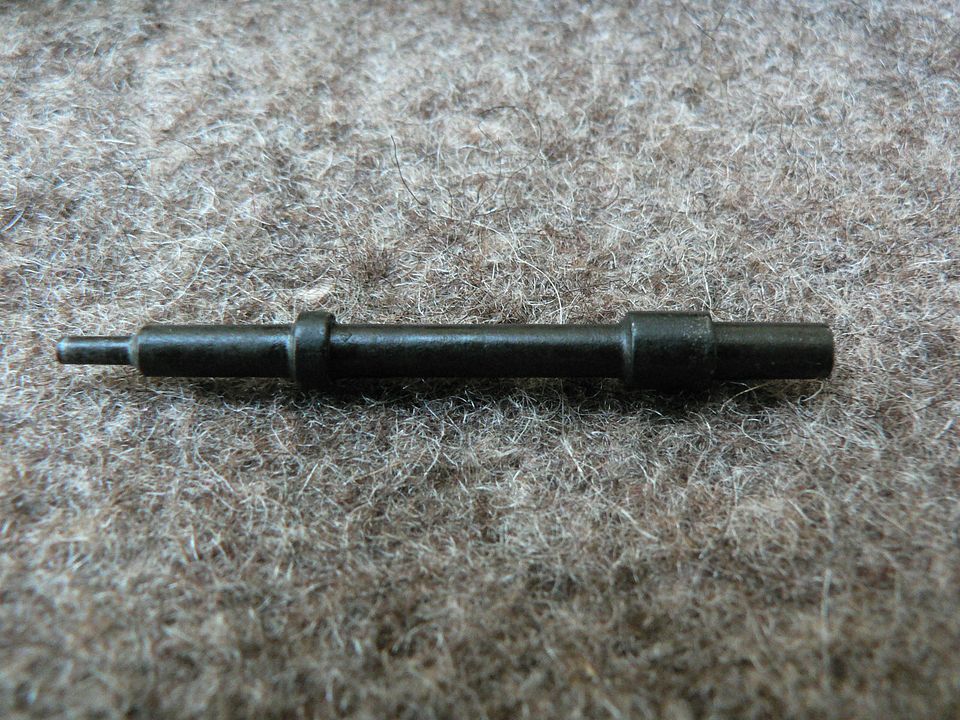 It's sprung but the spring is still glued up inside the slide due to dried lubricant so I can't show it to you. It just looks like a spring from a BIC click pen. I just sprayed some CLP up in the firing pin channel and called it good. It's not like I'm going to be shooting this thing. Below is a picture of this pistol's firing pin (at top) compared to a NOS one that I bought from an individual in France to replace a broken one in a SAGEM made example I have: 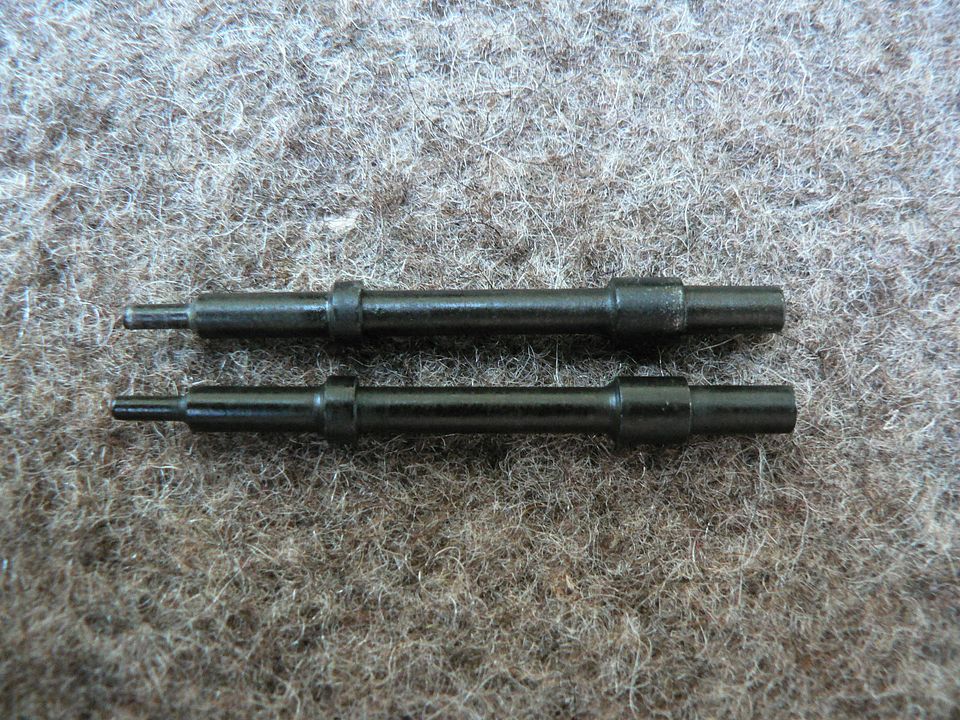 If you look very closely, you will see differences in them but they are 100% interchangeable. There were many parts suppliers for French weapons and you will find a plethora of variation among seemingly identical parts if you look at enough of them. They still interchange with no problems though.....most of the time. That's it for now. We'll look at the frame in the next post. Last edited by Wilhelm; 10-12-2024 at 02:12 AM. |
|
|

|
|
|
#5 |
|
User
Join Date: Oct 2007
Location: Maryland
Posts: 358
Thanks: 45
Thanked 125 Times in 59 Posts
|
Moving on to the frame, here's a detail of the area where the serial number would have been placed, directly beneath the markings on the slide:
 Pulling back to look at the right side of the frame in general, we see consistent finishing marks throughout, telling us that the number was not removed but rather that it was never applied in the first place:  The left side of the frame showing the same finishing marks as the right side:  Left grip removed showing the disconnector and magazine safety mechanism: 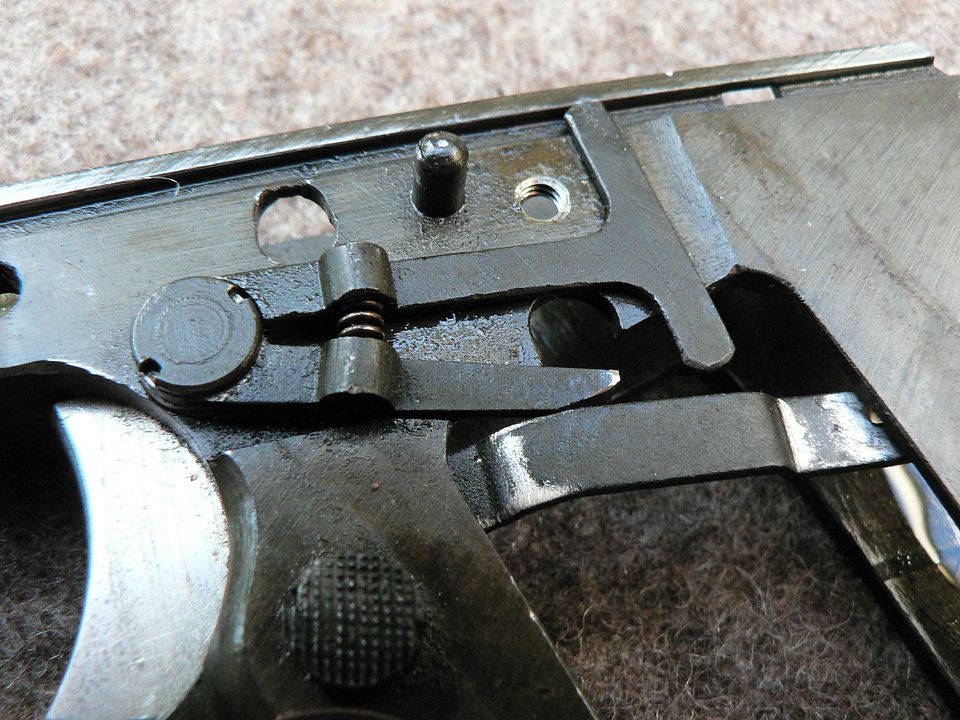 I may have gone a little overboard with the CLP! I didn't make any attempt at cleaning the old, dried lubricant off. I just applied new protectant and then generally wiped things down. A closeup of one of the grip screws: 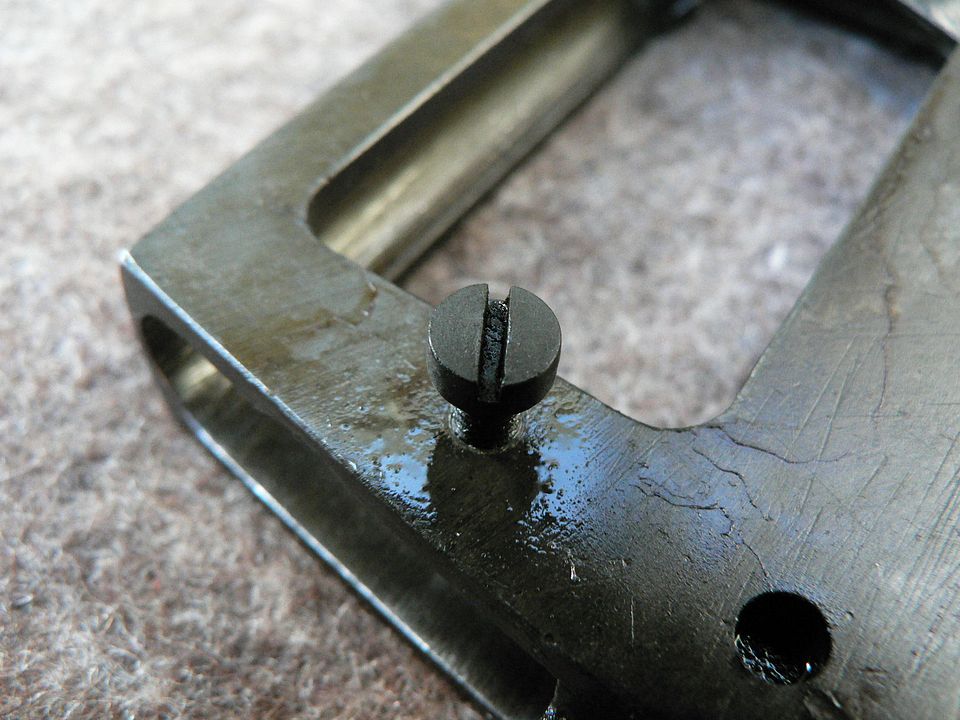 I think it's entirely possible that my removing them was the first time they'd ever been removed. Left and right side views of the frame in bright sunlight showing the greenish hue of the phosphate:  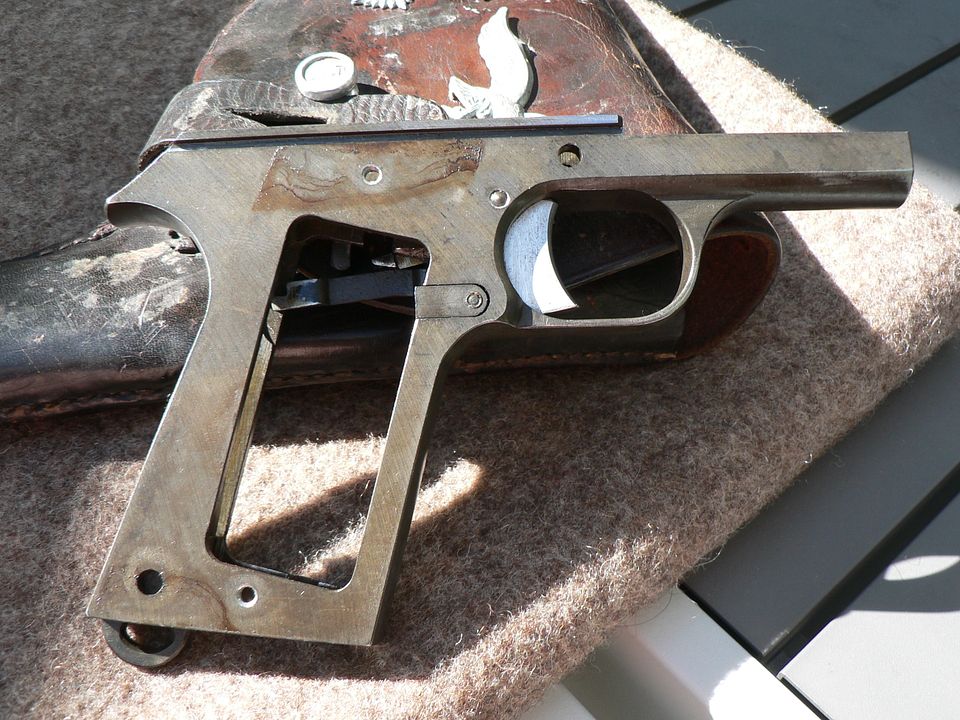 The brown underneath where the grip plates were fitted is not rust; it's dried lubricant. I saw no need to remove it. Just like the barrel, the feed ramp on the frame was polished. I have no doubt this was done at the time of manufacture, not later after being brought home:  The only marking I could find on the frame is an "N" in the hammer channel:  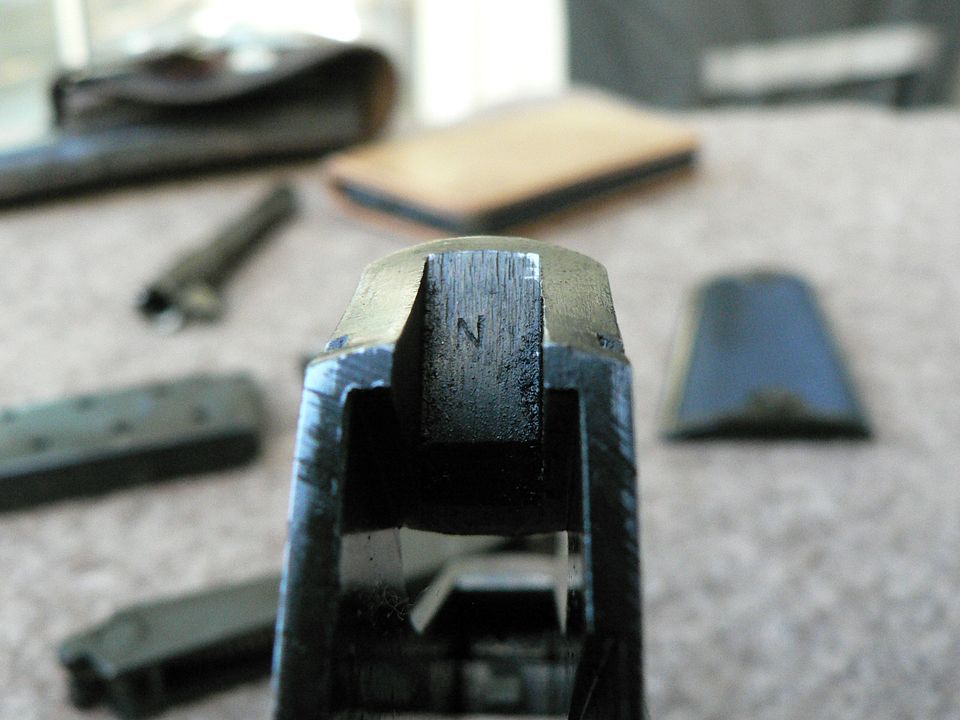 Again, the funk you see is not rust, just old funk. I can find no oxidation anywhere on the entire pistol. Next up is the magazine. |
|
|

|
|
|
#6 |
|
User
Join Date: Oct 2007
Location: Maryland
Posts: 358
Thanks: 45
Thanked 125 Times in 59 Posts
|
The last thing we need to look at on the pistol is the magazine. As far as I can tell, the magazine body and spring are the same as the ones found on the second model safety pistols. The parts that differ are the base plate, stop plate, and follower. We'll start with the base plate.
Unlike the later stamped steel version, the early examples are milled. They are also marked differently. Where the stamped pattern floor plates are marked "1935-S", the early ones are marked Mle 1935-S:  When we look at the top of the base plate, we can clearly see that it was milled from a single piece of steel:  View along the mounting slot:  The stop plate is a stamped part but it has a rivet attached to act as the stop lug. Top of stop plate:  Bottom of stop plate showing the part of the rivet that extends through the base plate to lock it in place: 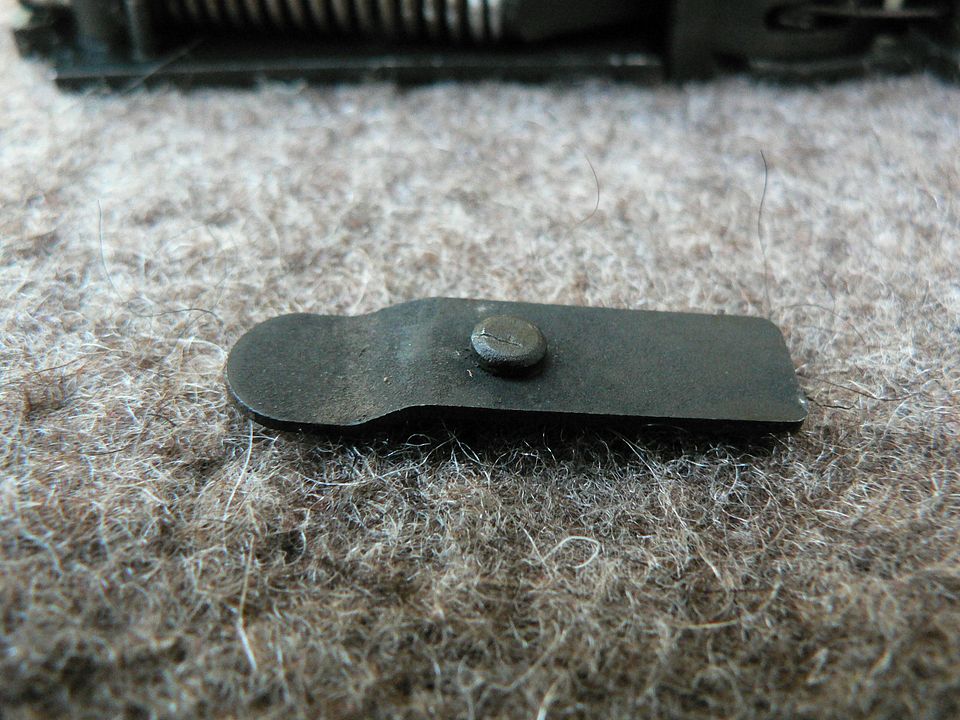 Later versions are stamped as well but lack a rivet. Instead, the locking lug is simply part of the stamping. Where the later type of follower is a single stamped part with an embossed stud acting as the bullet guide, the early followers are two stamped parts held together by a rivet, the head of which acts as the bullet guide. This is the top of the follower showing the rivet head:  Flipping the follower over, we see the base of the rivet which also serves to attach a second stamped part:  That part acts as the magazine spring retainer:  Other than the model designation on the bottom of the floor plate, I could find no markings on any parts of the magazine. That wraps up the pistol unless I notice something I missed earlier. To my knowledge, this essay is the only place one has been documented to this degree in any medium, printed or electronic. I hope it helps someone with their own research. I've also collected together some rarely seen accessories as well. Beginning with the next post, we'll begin looking at some of them beginning with the regulation cleaning kit that the French put together by mixing a little bit old with a little bit of new. I hope you'll enjoy seeing these things as much as I enjoyed tracking them down. I'll see you soon. |
|
|

|
|
|
#7 |
|
User
Join Date: Oct 2007
Location: Maryland
Posts: 358
Thanks: 45
Thanked 125 Times in 59 Posts
|
Today I want to start taking a look at some of the now obscure and rare accessories that were originally issued with each pistol. They were designed to work with both the 1935A and the 1935S pistols but I'm only going to be looking at them in relation to the S model. Many of the pistols have survived these almost 90 years since being first issued but very few of the early accessories or maintenance/cleaning kits are still around. So, I want to document the items that I've gathered in order to hopefully expand the online knowledge base a little bit. As you should know about me by now. I love all the little bits as much or maybe even more than the firearms themselves. Because of the large number of posts, this is going to take a few posts spread out over a number of days but please feel free to chime in between my posts and share your knowledge and pictures of your little treasures. I'd love to hear what everyone has to offer.
We'll start by taking a look at the cleaning rods and a few examples of the maintenance kit:  First up are the rods:  The lower one is the first model and it's made of brass. In the provisional manual dated December of 1939 (which strangely doesn't seem to have actually been printed until 1947) they only refer to a brass rod. There is no mention of a steel one. It's not until the March of 1951 First Edition manual that a steel rod is included in the text on page 37 "A cleaning rod, 15cm long, in parkerized soft steel or in brass....". Here is a detail of the slotted end for the patch:  And the handle end which is knurled:  The manual states that the hole is for a string. Why you would attach one is not explained. In my research I've seen slight variation in knurling and slot sizes. I've also seen steel rods that are not drilled for a string and some with a pin punch at the knurled end. Some say that these are also rod variants that were made for the PA 35 ("PA 35" is an French generic term referring to both models of the pistol). That may be but I have found no official documentation of this. Next are what collectors usually call the "cleaning kit". We're going to be looking at five of them, both marked "PA 1935" and unmarked: 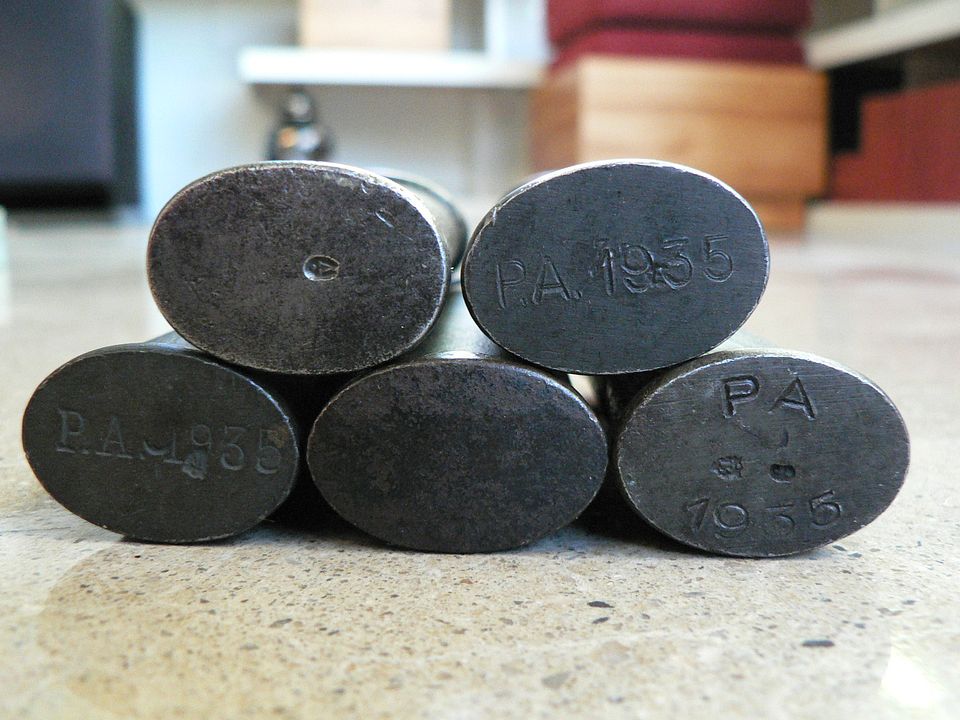 In the 1939 provisional manual text, the kit is simply called the "Complete disassembly and maintenance kit" and is numbered as "2X" to reference it on the fold out illustrations at the end of the manual:  On the nomenclature part of the fold outs, it's not listed at all, only its contents, each with their own number:  2X1 Case 2X2 Double blade screwdriver 2X3 Pin punch 2X4 Articulated brush On the illustration, it reads, "MAINTENANCE KIT-2X":   By the time of the March 1951 1st Edition Notice/Manual, the name of the kit had changed. On page 37, it reads: 18. Each model 1935-S pistol comes with : — a model 2X maintenance kit — a cleaning rod It then goes on to list the contents of the kit and talks about the cleaning rod:  There are a couple very interesting things to be seen here. First, the illustration shows the bottom of the case as correctly being marked "P.A. 1935". However the writer has incorrectly type "F.A. 1935" in the text. Second, as noted above, the text reads, "The bottom of the case is marked : F.A. 1935." However, two of the five kits I have are not marked as PA 1935. I have read where one collector states that these unmarked kits were used between the war generically for both rifles and pistols but he provided no documentation of this. Additionally, the articulated brush is kind of short for use in a rifle barrel and there is no provision for attaching it to the Model 1922 pull through issued with each rifle at that time. In fact, the Model 1874 maintenance kit was issued for use with rifles. The 1874 case is the same, but the contents are different as illustrated below:  So, until I find source documents to the contrary, I'm going with the hypothesis that some "Model 2X Maintenance Kits" simply didn't get marked "PA 1935". All of the evidence points to multiple companies producing these kits and variation is not only to be expected but, as we will see in a bit, it was the norm. We continue with the kit in the next post. |
|
|

|
|
|
#8 |
|
User
Join Date: Oct 2007
Location: Maryland
Posts: 358
Thanks: 45
Thanked 125 Times in 59 Posts
|
Here, we see the proper contents of a Model 2X Maintenace Kit for all types of PA-1935 pistols:
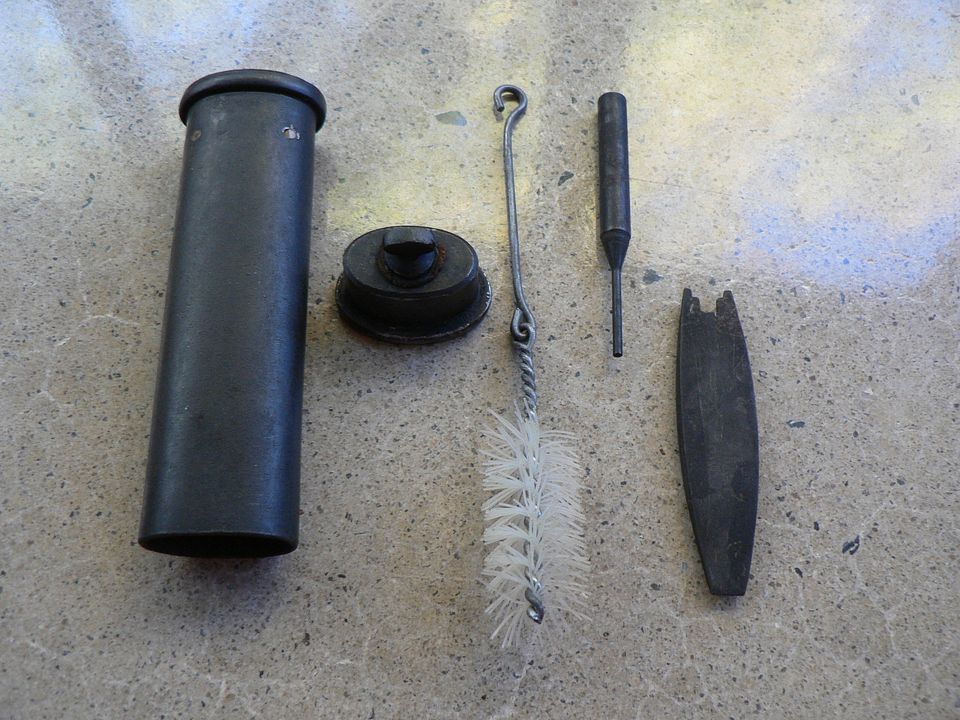 According to the provisional notice/manual, using the tools contained herein, you can completely disassemble your pistol down to the smallest part. It even gives you step by step instructions for doing so. However, it also states that "COMPLETE DISASSEMBLY OPERATIONS ARE STRICTLY FORBIDDEN AT THE UNIT LEVEL". By the time the 1st edition manual came out in 1951, it seems that they didn't want this information floating around anymore and they only tell you how to field strip the pistol. I can only guess how many Moe Rons screwed up their pistol by taking things a part they probably shouldn't have. And so, while you very well may be able to completely disassemble your pistol with this kit, I'm one of those Moe Ron's so I'm not going to be doing that! We looked at this picture earlier but I want to discuss it a bit more:  What we are looking at here is referred to in the manuals as the "bottom of the case". While that is true, it is more accurate to say that we are also looking at it the bottom of the cute little oiler that forms the cap for the case. We'll talk a bit more about the oiler shortly. What I want to draw you attentions to here are the three that are marked "P.A. 1935". Notice that all three are marked slightly differently and all three use a different font. As I said earlier, it's clear that more than one company was most likely manufacturing these. At a minimum, more than one company was marking them. Notice too, that four of the five have either inspection or manufacturer stamps on them. This is common on these kits from their first appearance as the Model 1874 kit in.......you guessed it, 1874! It was originally designed for the Model 1873 revolver. The case was the same as we see here but the tools included inside were different. This little gem was apparently quite a hit with the troops and, in short order, it was adapted to all manner of pistols and rifles until finally being abandoned in the late 1950's or early 60's. In every instance, the case was the same, only the tools inside changed to suit the firearm it was intended for. To my knowledge, it's use for the PA 35 is the only instance where the case was marked at the factory for the firearm it was intended for. Sometimes an 1874 kit was numbered to the rifle or pistol it was issued with, sometimes not. These five kits have all kinds of different markings, so many that I'm not going to bother showing each little mark because it would be too confusing. But I do want to show both ends of each case. 1st case: Bottom of oiler unmarked save for the hallmark:  Slotted end unmarked: 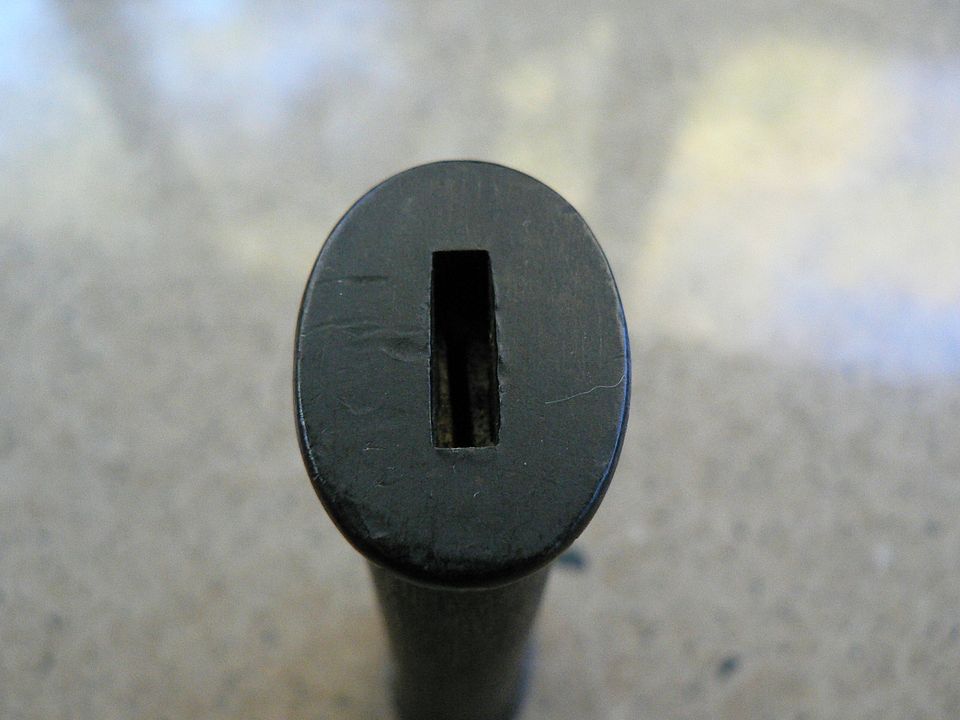 The slot accepts the screwdriver blade. We'll talk about that later. 2nd case: Bottom of oiler completely unmarked: 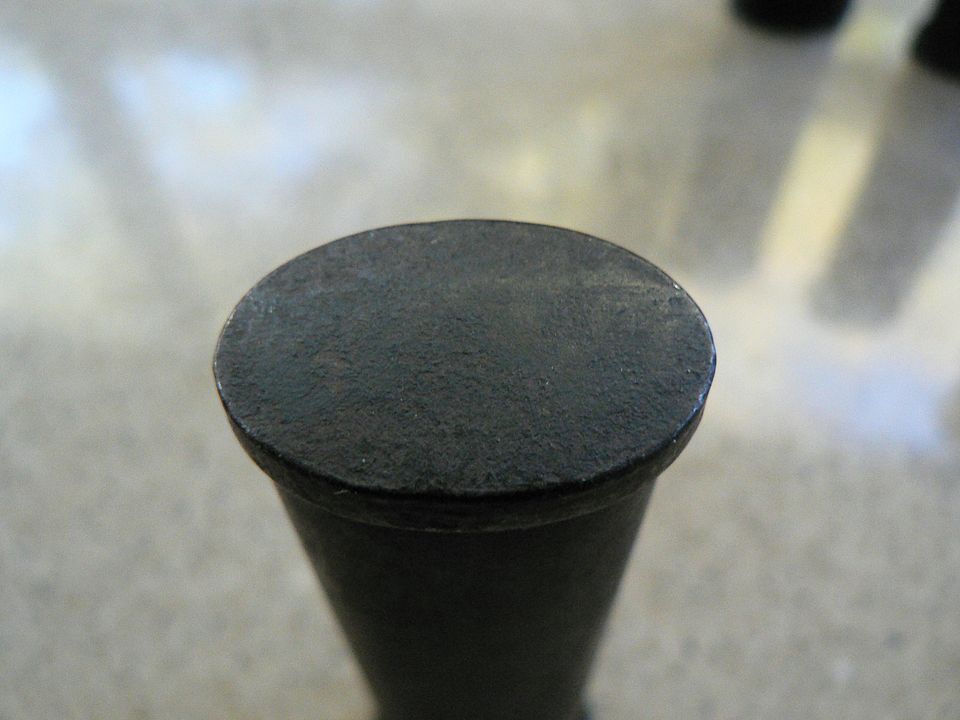 On every case I have seen other than this one, the bottom of the oiler is flat. This one is slightly rounded. I have no idea why. Slotted end unmarked:  3rd case: Bottom of oiler marked:  Slotted end marked with several hallmarks:   4th case: Bottom of oiler marked: 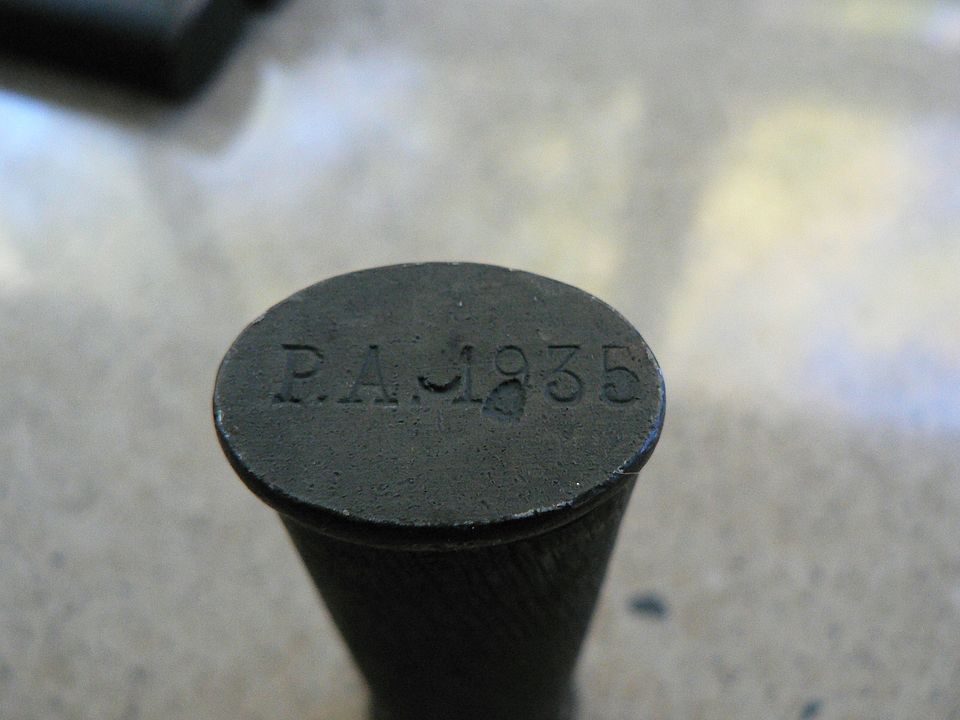 Notice that the stamp is interrupted by the hallmarks. Did the hallmarks come first or did the PA 1935 marking? Did the same company stamp both the hallmarks and the designation marking? Did the straight line marking eventually change to the curved type shown above because of the conflicting stamps? Were previously used 1874 cases repurposed for use with the PA 35? I don't know, do you? Will we ever know? Probably not. I do have some thoughts though and I'll present them later. Slotted end marked with a "G":  5th case: Bottom of oiler marked: 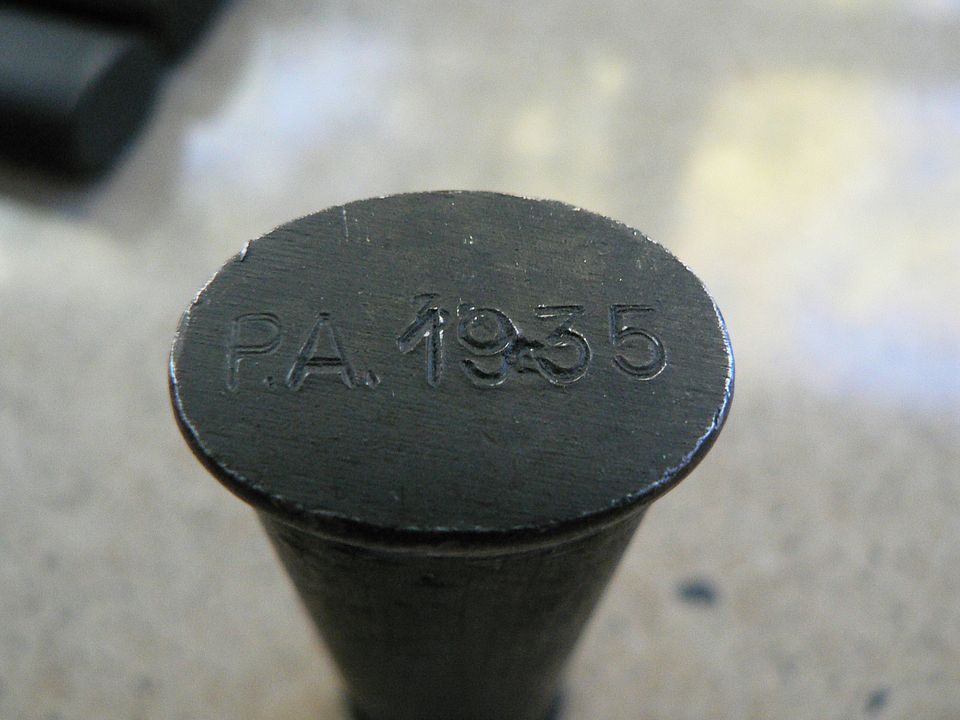 Again, we see the hallmark interfering with the designation stamp. Slotted end marked with several small capital "P"'s :   We continue with the kits in the next post. |
|
|

|
| The following member says Thank You to Wilhelm for your post: |
|
|
#9 |
|
User
Join Date: Oct 2007
Location: Maryland
Posts: 358
Thanks: 45
Thanked 125 Times in 59 Posts
|
Okiedokie. It's time to pick up where we left off with the maintenance kits.
The body of each kit is a piece of sheet steel rolled into an oblong shape and then brazed along the seam where the two ends meet. This seam is slightly visible when the body of the kit is phosphated but invisible when painted. Below are a couple pictures of an older 1874 kit (pre-PA35) left in the white that shows the seam relatively clearly:   The slotted endcap of the tube is attached to the body by pins that are supposed to be ground flush. On older kits, those pins are steel and so well executed that they can be all but invisible but the PA 35 kits I have use gold colored pins that I'm assuming are brass and on a couple kits, they aren't so nearly so well fitted as on the older kits. A couple examples, one with visibly brass pins:  The other with pins that have been painted black along with the rest of the case: 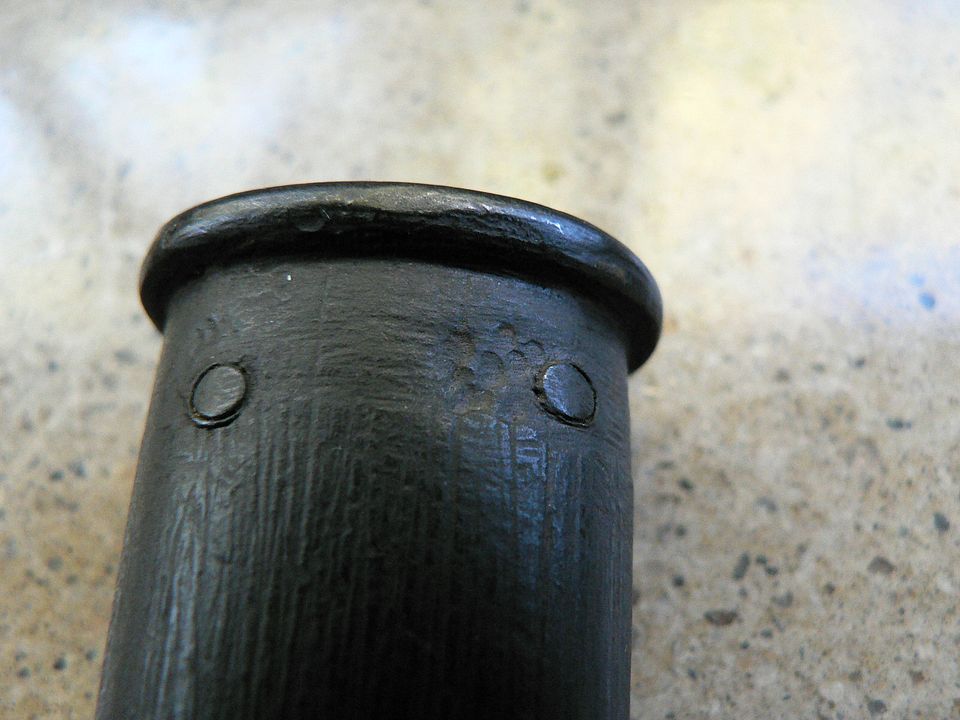 I'd like to point out at this point that the PA35 kits I have show all kinds of mixed finishes. These range from green paint to black paint, phosphate and bare steel. There is no rhyme or reason and various finishes can be found on one kit. In my limited experience, it seems that all pre-PA35 kits were either left in bare steel or had some sort of thick black coating applied. Here is an example of what I'm talking about: 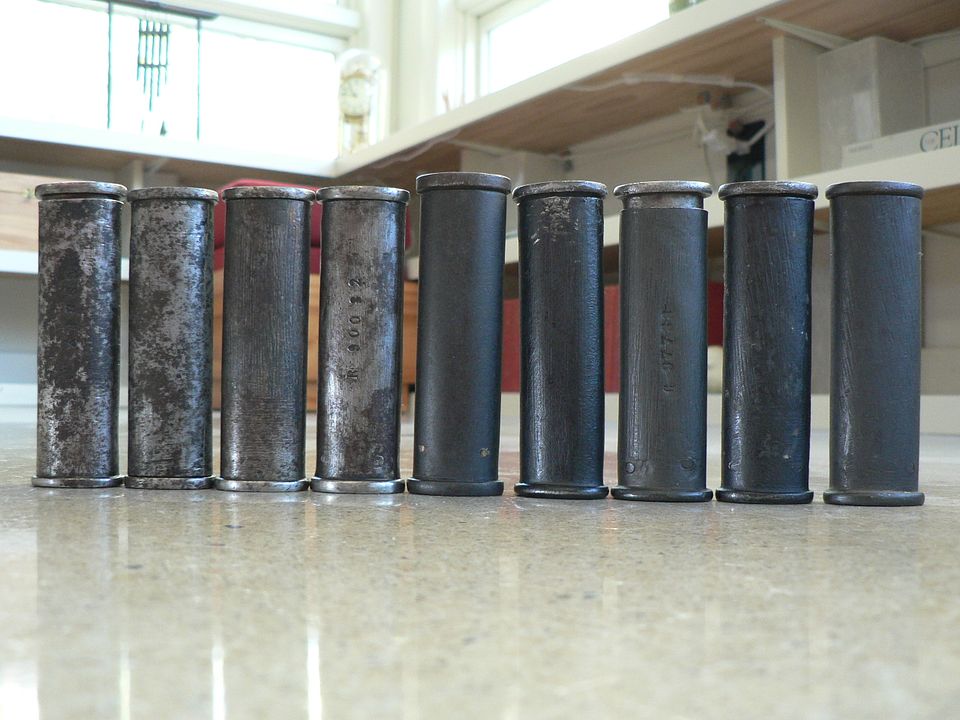 The four on the left are old 1874 kits that could be so old as to be issued with a Gras or new enough to have been issued with a MAS 36. The five on the right are PA 35 kits. Also notice that they are of varying overall lengths and the thickness of the steel on the ends varies as well. The body on one of the kits was cut too short! 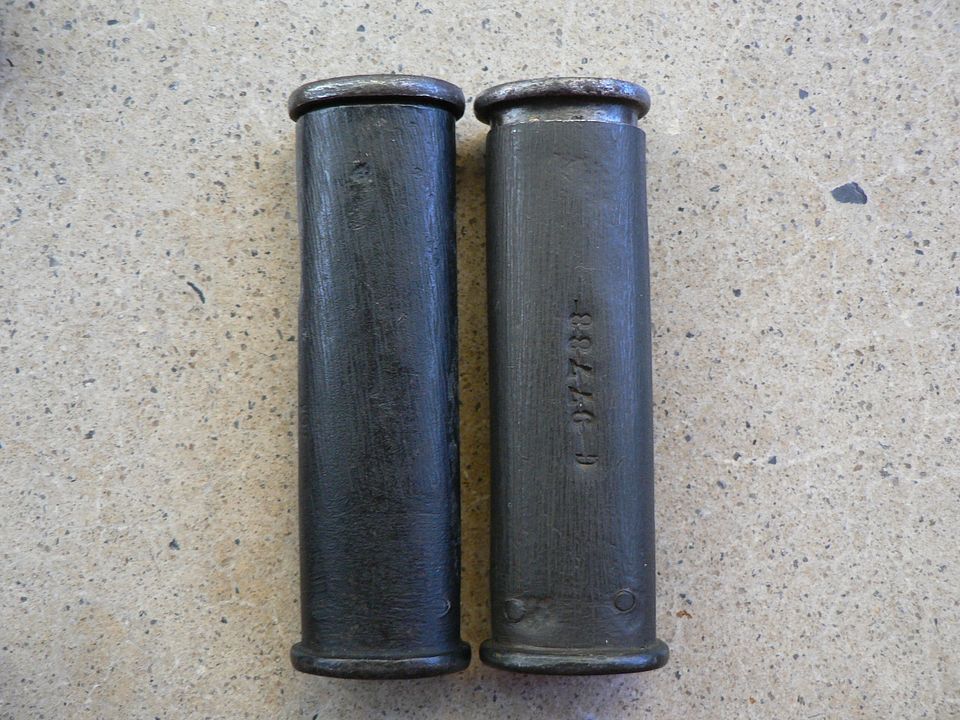 The cap still fits snugly but it won't fully seat because of the length of the tools inside. One of them was originally numbered C97788, a number that was never applied to any PA35: 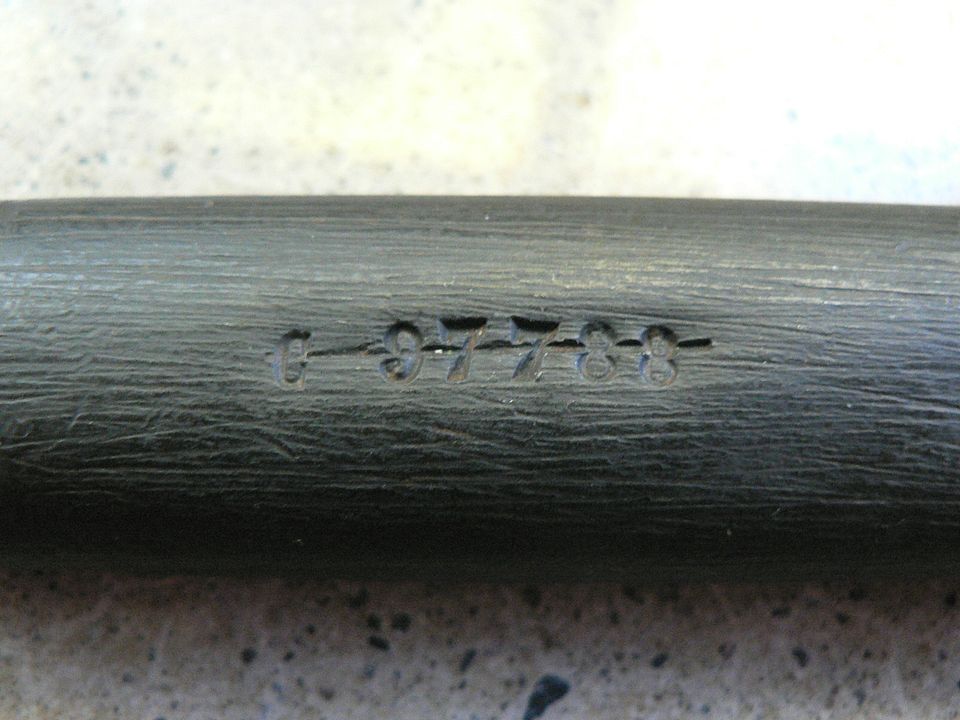 As you can see, number was crossed out, something commonly found on kits as they appear to have often been repurposed for a different firearm. What's really weird about this one is that the new number is 77633 with a prefix that appears to be an upside down "V" and a "C", a prefix that was never used on any French rifle or pistol that I am aware of. Hell if I know.....  I mentioned earlier that the slotted end of the case is designed to friction fit the screwdriver blade but I forgot to take a picture of it. So, here's a picture I used in a write up about postwar MAS 36 cleaning kits. It's a standard 1874 kit with its blade fitted so that the body of the case acts as a handle:  One last thing about the cases, something I didn't manage to get a good photo of, is the fact that all of them have wood in the bottom, cork, I think. I'm pretty sure the reason for this is to keep the parts from rattling around inside. The friction fit cap for the case is a cute little oiler: 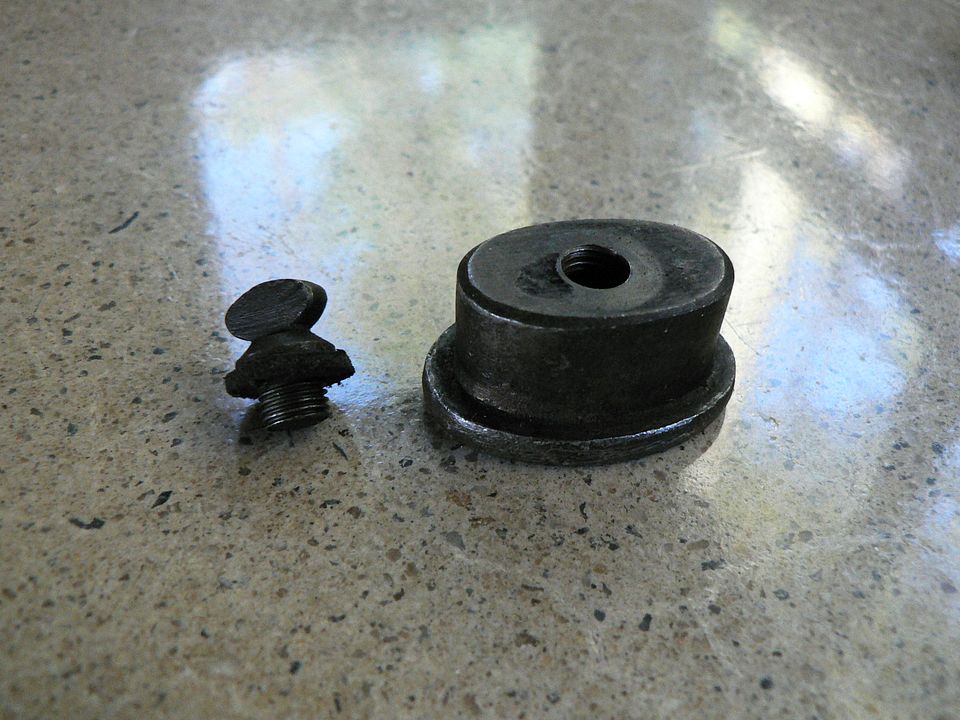 It has a finely threaded screw cap with a leather washer to prevent leakage. The fine threads and leather seal work so well that two of the five oilers still have oil inside but I think one them has an organic based oil because it STINKS! Here are the five oilers compared: 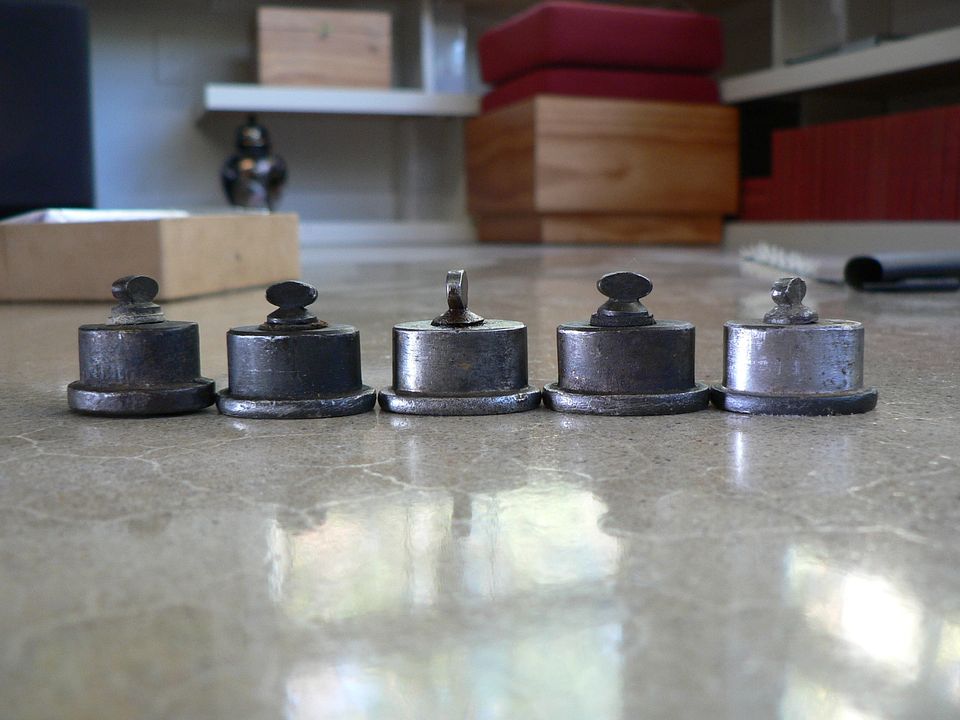 They vary from bare steel to painted to phosphate. On a couple, there are two finishes on the same bottle. The screw caps will interchange among all of them. We'll finish up with the kits in the next post by looking at the tools inside. Last edited by Wilhelm; 10-25-2024 at 11:45 PM. |
|
|

|
| The following member says Thank You to Wilhelm for your post: |
|
|
#10 |
|
User
Join Date: Oct 2007
Location: Maryland
Posts: 358
Thanks: 45
Thanked 125 Times in 59 Posts
|
I posted this picture earlier but I need to post it again as a reference for this post:
 Above is the proper contents of the maintenance kit. We've already looked at the case and the oiler so now we need to look at the tools. Of the five kits we're looking at in this article, one of them was missing the pin punch unfortunately:  They are just tiny little things, necessitated by the need to fit into the case. Measuring in at about 2 3/8", this tool is used to remove the various pins holding parts in place. Parts such as the extractor, loaded indicator, barrel link, the entire ignition system carried by the mechanism support, etc. Notice how each one is a little different. A rear view showing clear proof of being turned on a lathe:  They were made for function, not for looks. Next up are the screwdriver blades. Here's one side:  And the other side:  You'll notice the differing stamps on them. Whether these are final inspection marks, makers marks, or both, I don't know. Sometimes, they are marked on one side, sometimes both sides, and sometimes not at all. The standard end is used to remove the grip screws. The specialized end is for removing the trigger axle (which also holds the disconnector and magazine safety levers in place) and disassembling the magazine catch. While the markings on the blades vary, the specialized end is finely machined and exactly the same on each blade for obvious reasons. Here's a closeup of the specialized end:  In case you're wondering, this also fits various screws and nuts on a MAS 36 rifle. Here, we see it engaged with the trigger axle:  As expected, it is a very precise fit. And here, with the magazine catch button:  Unlike a Model 1950 Pistol, these bits are not peened in place on the 1935S, so they should be somewhat easy to disassemble. But one wrong move ends up with a bunged up part so we aren't disassembling these bits. If you want to see what they look like disassembled, experiment on your own pistola! The last tool in the kit is the articulated bore brush. I've laid all five out here:  The bristles on these range from very stiff to very compliant. And that's not the only difference. Even a cursory examination reveals that the wire is of differing thickness. Additionally, the braid on different brushes is wrapped in different directions:  And the loop at the end of the handle differs from brush to brush:  The above pictures are ample proof that a number of companies were making these things. Also, they are so obscure that I'm confident that no one is faking them. If they were WWII German, yes. Post war French, not a chance. These things might be ridiculously rare but they are also almost completely unknown unless you are a total French nerdo such as myself. The brush is just a tad longer than the barrel:  So, the way you use this thing is to insert the end of the handle into the chamber and slide it in until the bristles come up against the rear of the chamber:  Then, you use the tip of your index finger to push on the end of the bristle portion until it's even with the rear of the chamber:  At this point, the looped end of the handle is poking out of the muzzle:  Then, you simply grasp the loop and pull the brush through the barrel and out the muzzle end. Here, we see the bristle portion pulled part way out of the barrel showing the difference between the diameter of the bore and the diameter of the brush:  If you've followed the instructions in the manual, cleaned your barrel immediately after firing that old corrosive ammo and cleaned it well, you'll end up with a bright and shiny bore:   So that's it for the maintenance kit. In the next post, we'll look at some seldom encountered early holsters for the PA35. I hope you're enjoying this, and I also hope to see you then. Bye for now! |
|
|

|
|
|
#11 |
|
User
Join Date: Oct 2007
Location: Maryland
Posts: 358
Thanks: 45
Thanked 125 Times in 59 Posts
|
In this post, we're going to look at the original holster designed for both models of the PA35. Referred to the Model 1937 holster by collectors and simply the "holster" in the 1939 Provisional Notice (manual), it's official designation according to page 15 of the June, 1961 "Nomenclature of Military Equipment" is the Model 1935-37 and it's part number is 159-021 412 001:
 It's the sixth item from the bottom:  The holster was designed to hold the pistol, cleaning rod, and two extra magazines:  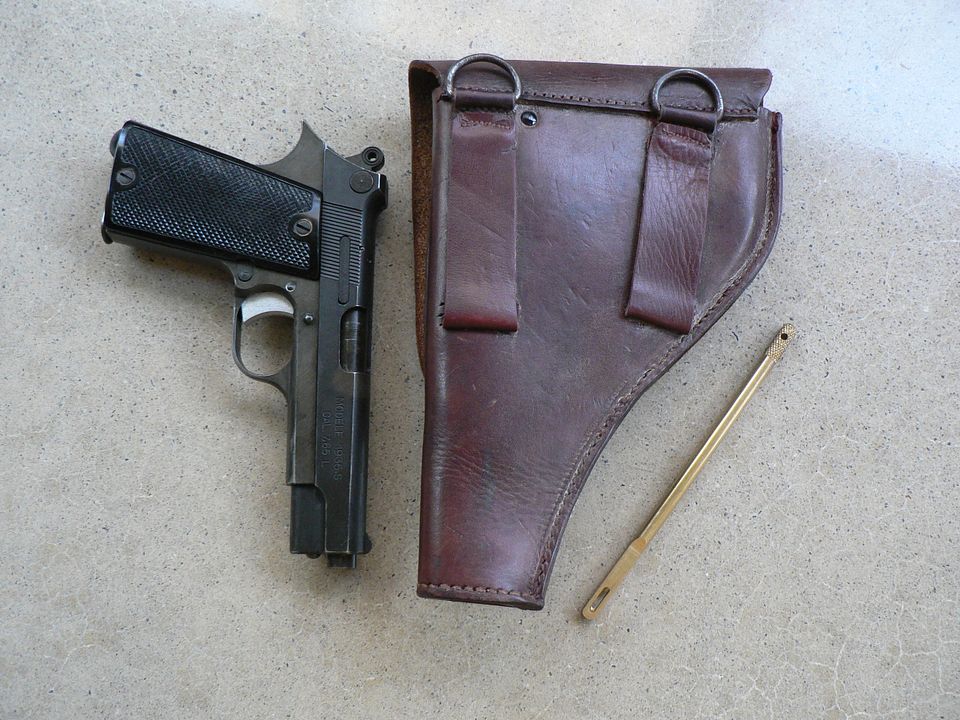 Notice that the rear of the holster has two belt loops and two steel d-rings. This is a modification from how it was originally manufactured. When new, the arrangement was, to quote the Provisional Notice: "Two loops for the regulation belt, one with a ring and a pin buckle, the other with a retaining tab." The ring and pin buckle would have been mounted to bottom and top of the right belt loop respectively and both were steel. The tab was leather, had a button hole cut, and was mounted at the top of the left belt loop facing to the left. These items were on there so that the holster would properly attach to the 1935 equipment harness. However, the one pictured here has had both belt loops replaced, the pin buckle and tab removed, and a steel ring has been installed at the top of each belt loop. The 1935-37 holster is seldom encountered anymore but the few that are out there are sometimes in original configuration, sometimes in this configuration, and I've even seen them with no rings, buckles, or tab at all, just two belt loops. The modifications I've seen are always very professionally done and my belief is that this was done after the war by the French in order to simplify it because of changes in their equipment harness. When we look at the Mle 1945 holster, you'll see just how simple the back of that holster is and that is why I think the changes were made to this one. It's also possible that this one was modified for cavalry use because of a little gem I found tucked away in one of the magazine holders. More on that in a bit. Whatever the case, when and why these modifications were made will probably never be known. All we can do is speculate. Flap open showing the accommodation for two spare magazines: 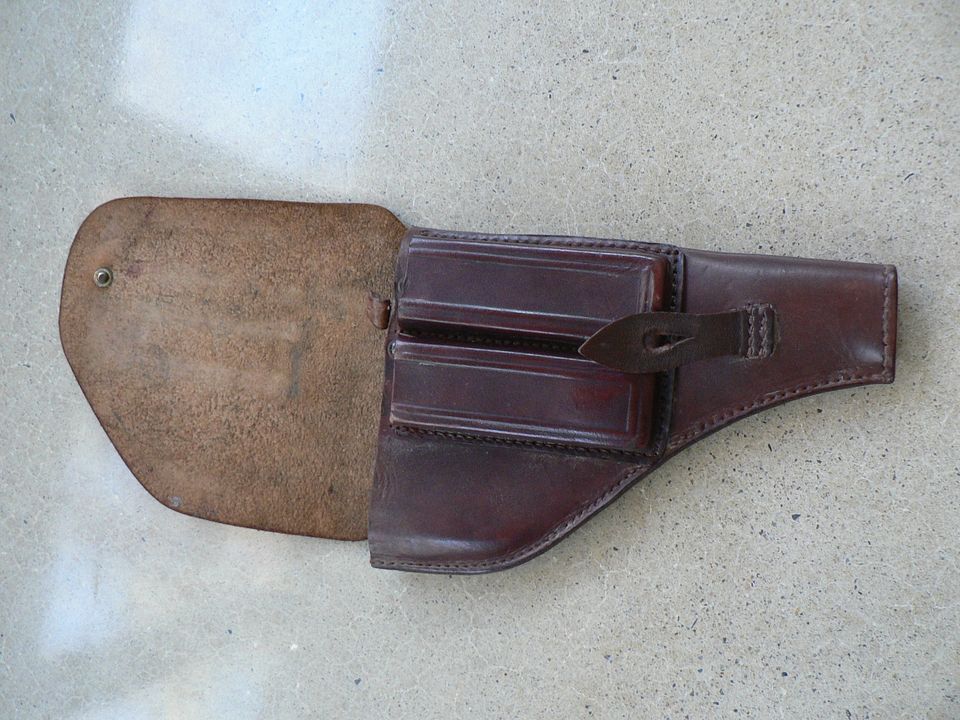 There are two stamps on the flap, one round and one oval, but they are all but impossible to read. Here's the best shot I can get of the round one: 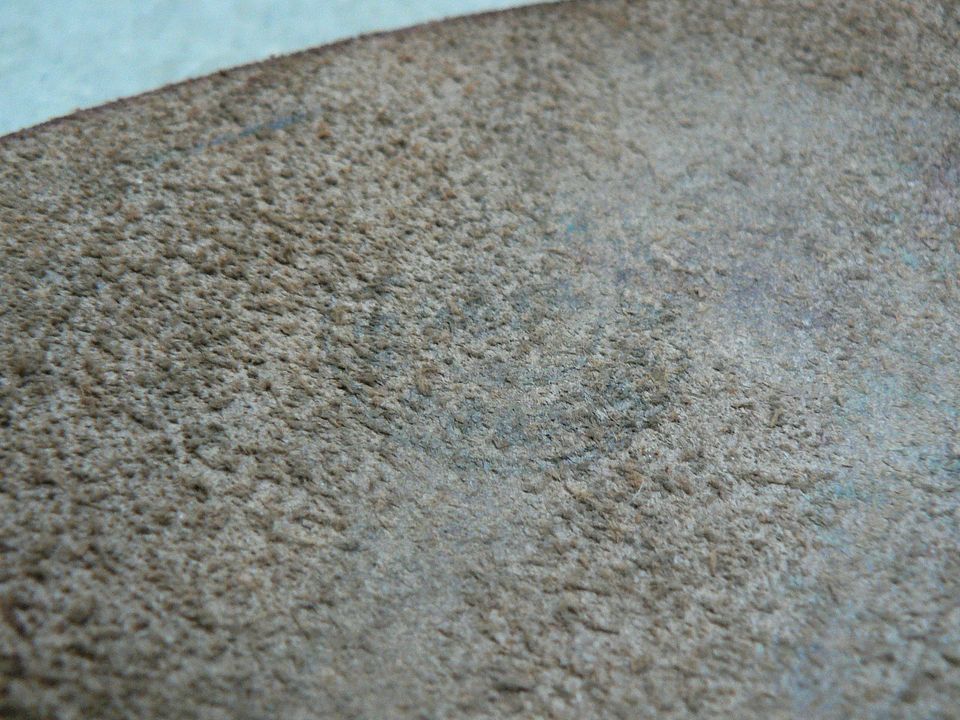 After extremely close examination of the stamps under different lighting conditions and varying magnification I can just make out a 38 or maybe 39 as the date. I wouldn't testify to that under oath though. Here are two angles of the pistol and magazines nestled:  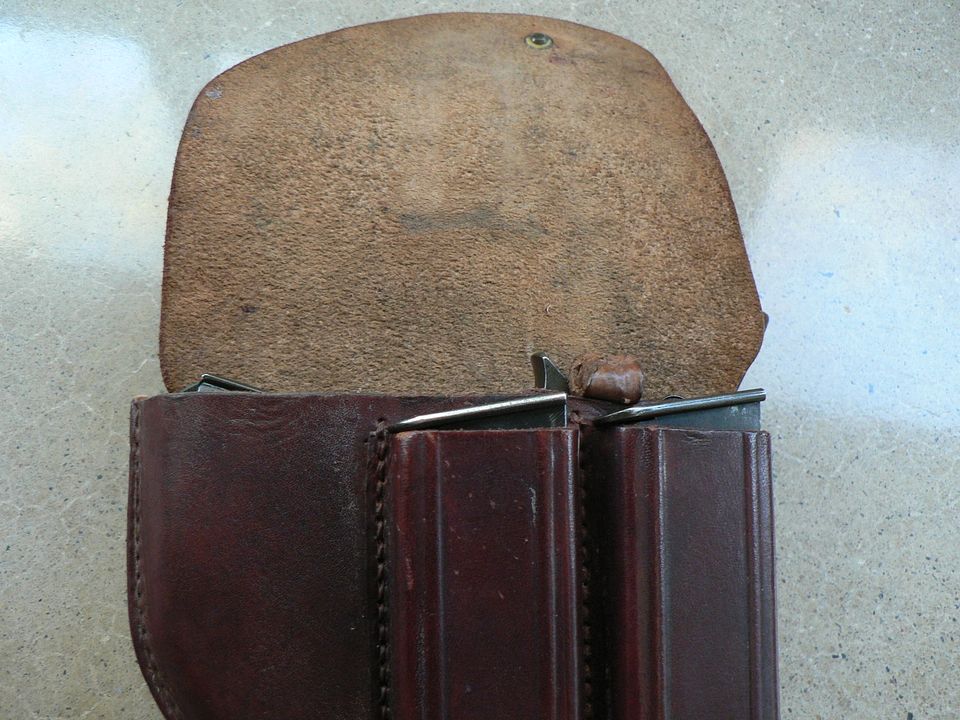 You can see that the holster absolutely swallows both the pistol and magazines and I'm sure it does a great job keeping debris out. I'm also certain that it would be a HUGE pain getting your pistol out and into your hand for use under combat conditions! To remove the pistol, you pull up on a leather removal strap. Below, I've pulled the strap as far as it will go to illustrate how much it raises the pistol for removal:  With the pistol present and the flap secured, we can see a bulge in the flap from the magazines inside: 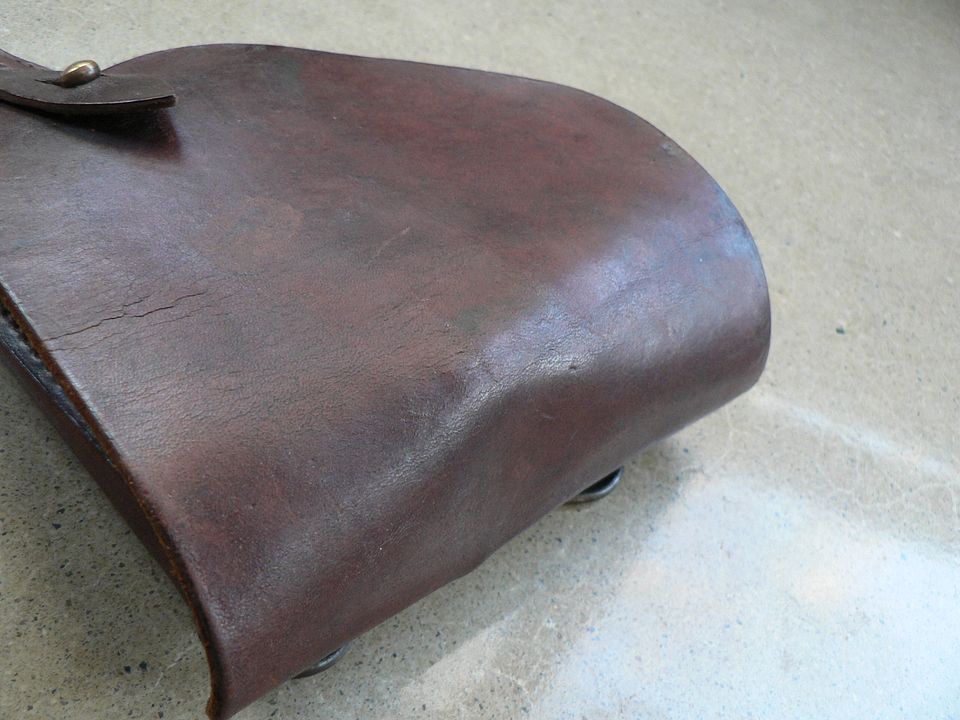 I'm sure that would somewhat stretch the leather over time so I'm thinking this holster saw little use when new. There are dark marks from the magazines though so it must have seen some service. I also know that service must have been French because of a partial document I found crinkled up inside one of the magazine holders:   I can't read cursive French but I know some of you can. Please tell me what this says. I at least know the writer was in a cavalry unit:  The other side lists such things as a Mle1892 revolver, automatic pistols (P.A.), sabers, 1924-29 machineguns, V.B. rifle grenades, and 60mm mortars:   We'll finish up with the Mle 1935-37 holster in the next post by examining some details. |
|
|

|
|
|
#12 |
|
User
Join Date: Oct 2007
Location: Maryland
Posts: 358
Thanks: 45
Thanked 125 Times in 59 Posts
|
We'll finish up with the Mle 1935-37 holster in this post by looking at some details.
Brass closure stud on outside of flap:  And inside of flap:  Top of replaced right belt loop showing the steel D ring: 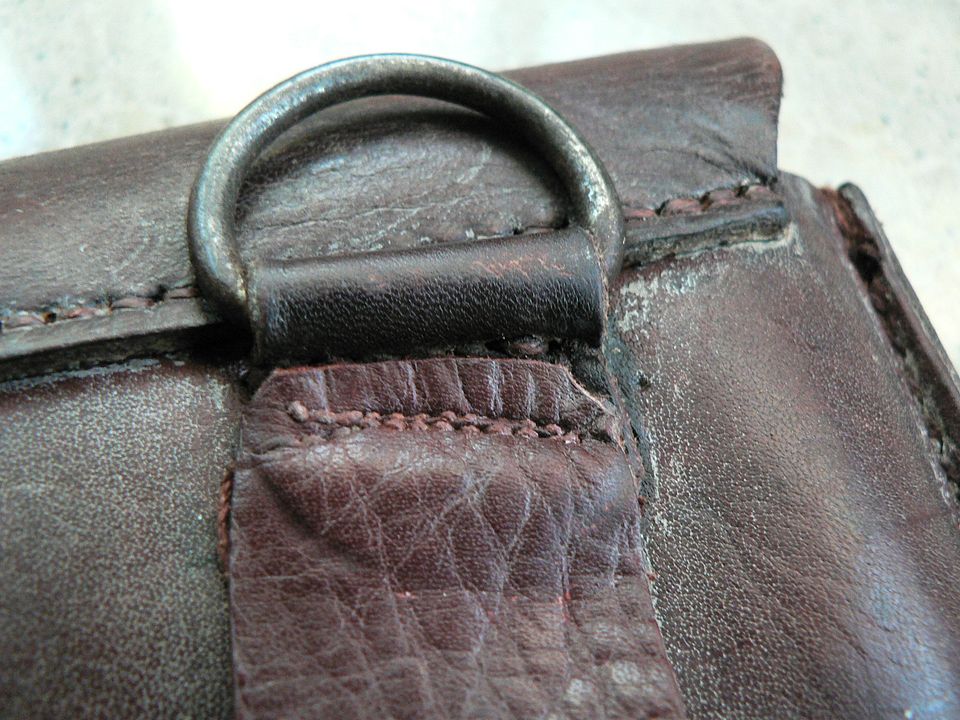 Notice the different thread and the leather is a different thickness too. It's very pliable, almost like pigskin but I don't think it is. Also, it's sewn to a pre-existing piece of leather holding the D ring that appears to be original to the holster based on the leather and stitching. But, according to the provisional manual, we're supposed to have a pin buckle here, not a D ring. However, the 1961 Nomenclature shown earlier does list modified holsters for the cavalry but not this model. I does list it in black for the Gendmarie though. Hell if I know what's going on! Left ring and belt loop:  At the bottom of the left belt loop, we find clear evidence of the modifications in the form of thread holes from the previous loop:  Detail of muzzle end:  Pistol removal strap:  Its end is secured by a brass rivet finished in black paint passing through the rear wall of the holster:  At its other end, it's secured by a piece of leather held in place by two brass rivets painted black:   In case you're wondering, no, a 9mm Model 1950 pistol won't fit. This is as far as it will go:  Here are a few size comparison photos of a 1935S compared to a 1950, both manufactured by MAS:    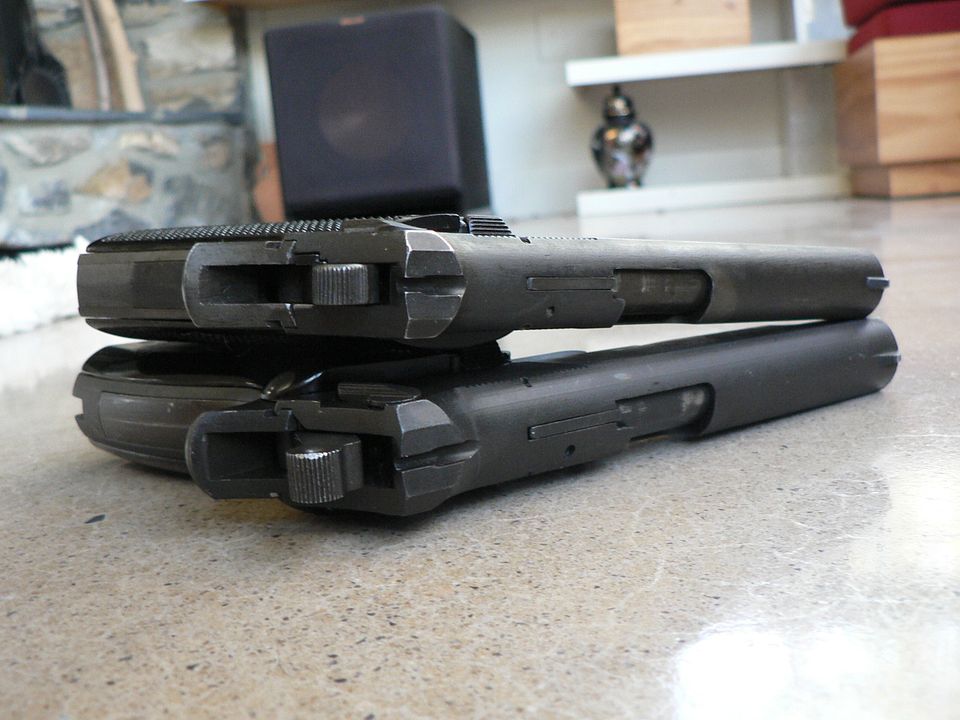 Looking at the four pictures above, the lineage is obvious. In the next post, we'll take a look at the Model 1945 holster that replaced this one. |
|
|

|
|
|
#13 |
|
User
Join Date: Oct 2007
Location: Maryland
Posts: 358
Thanks: 45
Thanked 125 Times in 59 Posts
|
Next up is the Model 1945 holster, part number 159-021 412 101. I have examples in both natural and black:
    Other than the color, these are identical. The stamps are faint so it's hard to get a good picture of them but the black one is dated January of 1946 and the natural one is from March of 1946. These holsters are exceedingly rare these days and are seldom encountered outside of pictures in books. Gone are the elaborate attachment buckles, rings, and tabs and we are left with a simple single belt loop. The 1935-37 holster was just plain overcomplicated. This one dispensed with the overcomplicated pull strap and instead used the much simpler design of cutting the leather lower so that you could get at the grip on the pistol:  The downside of this holster is the lack of accommodation for extra magazines. Just as with the 1935-37 holster, we get two stamps on the inside of the flap, a round one and an oval one. On the black holster the oval one, while pretty much unreadable, is obvious. The round one, not so much:  Here's a closeup of the round one on the black holster:  While you probably can't see it, it's a little easier to read the January of 1946 date in person. The oval stamp is so faint as to be gone on the natural finish holster but the round one is still barely readable. The camera can't really pick it up but it's dated March of 1946:  From this point forward, we're only going to be looking at the natural example. The closure strap is held in place by a steel rivet. Here's an outside view:  And an inside view:  Detail of the closure strap passing through its steel hoop:  Notice that there are two positions the flap can be closed in. The position shown is necessary for both the 1935A and 1935S. Presumably, you can use this holster for even smaller pistols by using the other slot in the leather. A couple detail views of the leather square used to attach the steel loop to the holster:   Attaching it this way keeps the loop from coming into contact with the pistol and rubbing against the finish. Stitching detail showing where the front and rear of the holster meet:   We continue with the Mle 1945 holster in the next post. |
|
|

|
|
|
#14 |
|
User
Join Date: Oct 2007
Location: Maryland
Posts: 358
Thanks: 45
Thanked 125 Times in 59 Posts
|
Finishing up with the Mle 1945 holster in this post.
Here, we see a general view of the closed flap with a pistol present in the holster:  You can see that the pistol is a perfect fit when the lower closure slot on the flap is used: 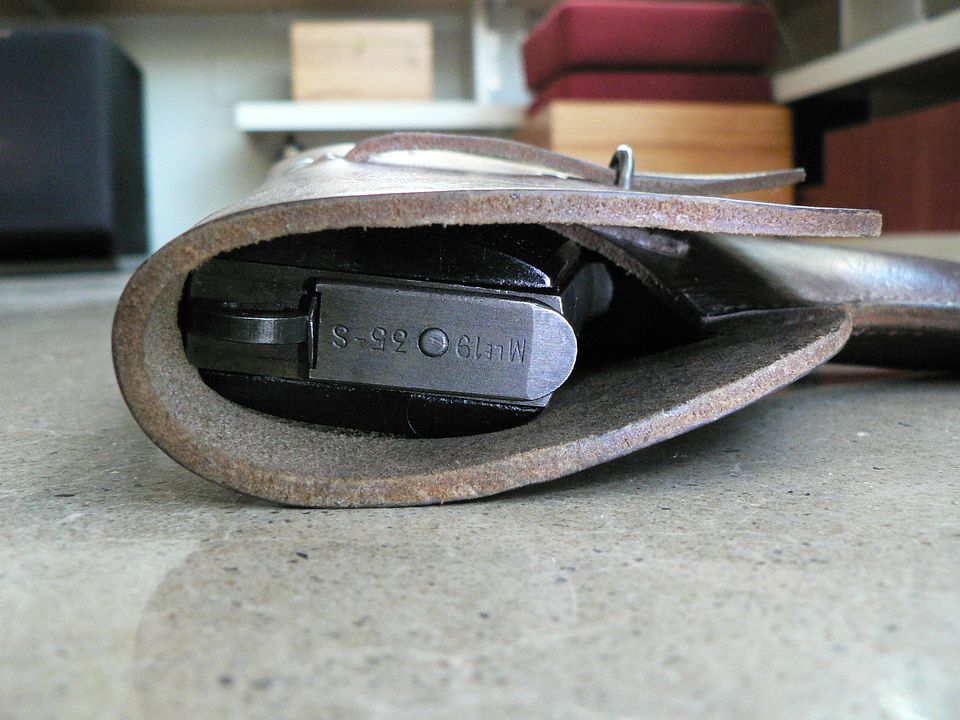 If you were to try to use the upper closure slot, it would be impossible to close the flap. Here, we see the holster flap secured by the lower closure slot with no pistol present: 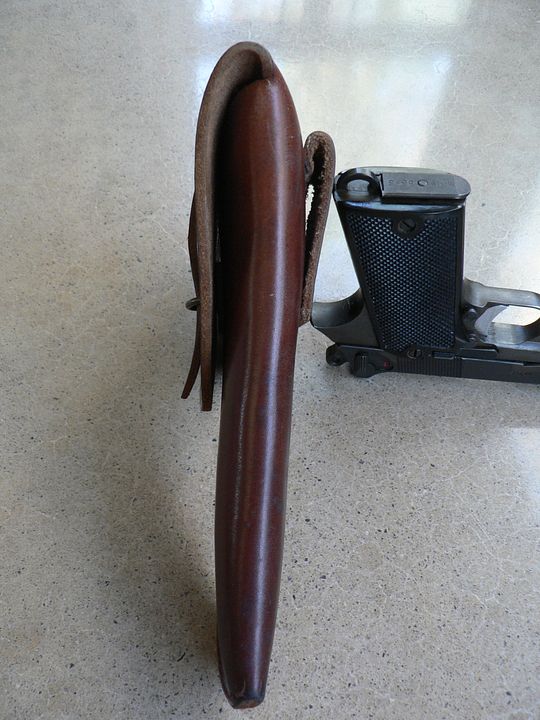 Notice the line produced by glare from the sun is generally straight except at the very top where it ever so slightly curves to the left of frame. And here, we see the holster flap secured by the upper closure slot with no pistol present: 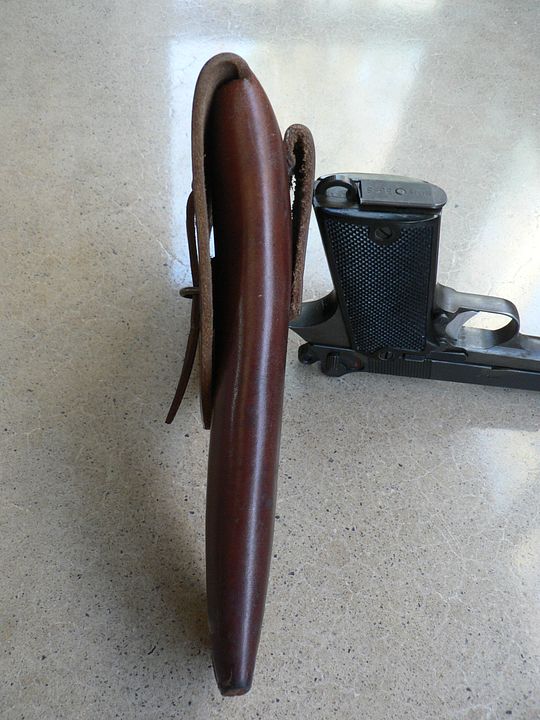 Notice the much more exaggerated curve to the glare line. Using this closure slot actually warps the shape of the holster. The reason for the two slots is that this was intended to fit most French pistols then in service. However, it would not fit pistols larger than a PA35 i.e. a P38 which was in service at that time. This must have been an unpopular design though, because yet another holster was introduced in 1948 as the 1948GT (Grand Taille, Large Size) and it's the one illustrated in the 1st Edition manual of March 1951: 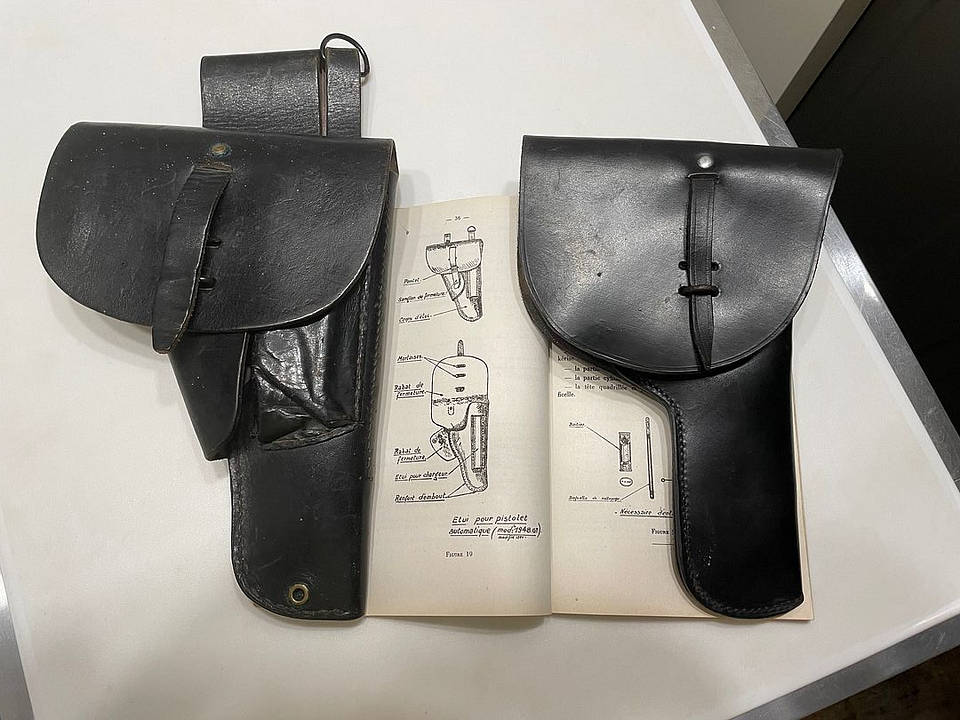 The 1948 is shown on the left and it's a later version of the 1948, the main difference being the belt loops. It looks to be about the same size as the 1945 but in fact is much roomier and will fit anything in service at the time including the P38. This holster would fit the Mle 1950 pistol too and I have no doubt some are still being used to this day as I think there are still a few PA50's still floating around France. Notice that it also has accommodation for a spare magazine, something absent on the 1945 jobber. And this is where we stop. Everything I have shown up to this point ranges from almost unknown to very seldom encountered and the point of this has been to document these things for future researchers. The 1948 holster is extremely common in all of its many versions so I see no need to discuss it at this time. One last thing. Since I discussed trying to fit a 1950 pistol into a 1935-37 holster, I might as well do the same with the 1945. It looks like a 1950 pistol kinda' fits:  Until we try to close the flap: 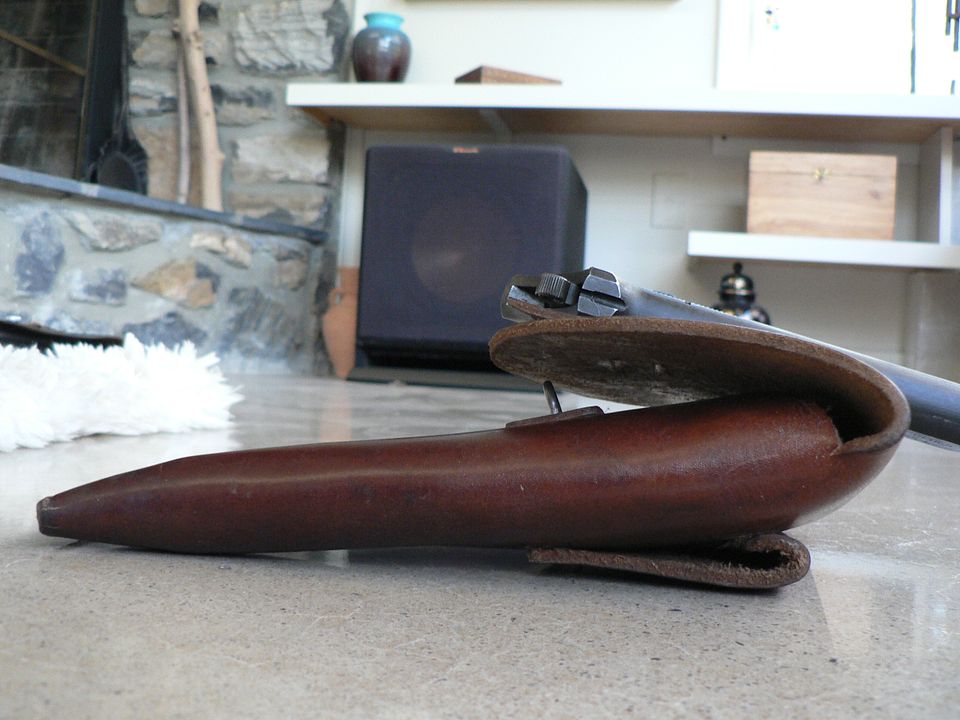 No amount of stretching or pulling is going to work! So, at long last, I have finished this article. If you own a 1935S and wondered about early accessories, well, now you have the most detailed information about the subject to be found online. I could still write a little more by looking at some of the manuals and other French government documents I've used to write this. If you want to see them, let me know and, if enough people respond, I'll take the time to do that. Otherwise, this is it for this topic. I hope you've found it helpful in one way or another and I hope to see you again soon. Bye for now! Mom, as always, thank you for EVERYTHING you did over the years trying to raise me right. I hope I haven't let you down and I wait for you every night in my dreams. Thank you for stopping by once in a while. I Love you and I'll see you soon. |
|
|

|
 |
| Thread Tools | |
| Display Modes | |
|
|